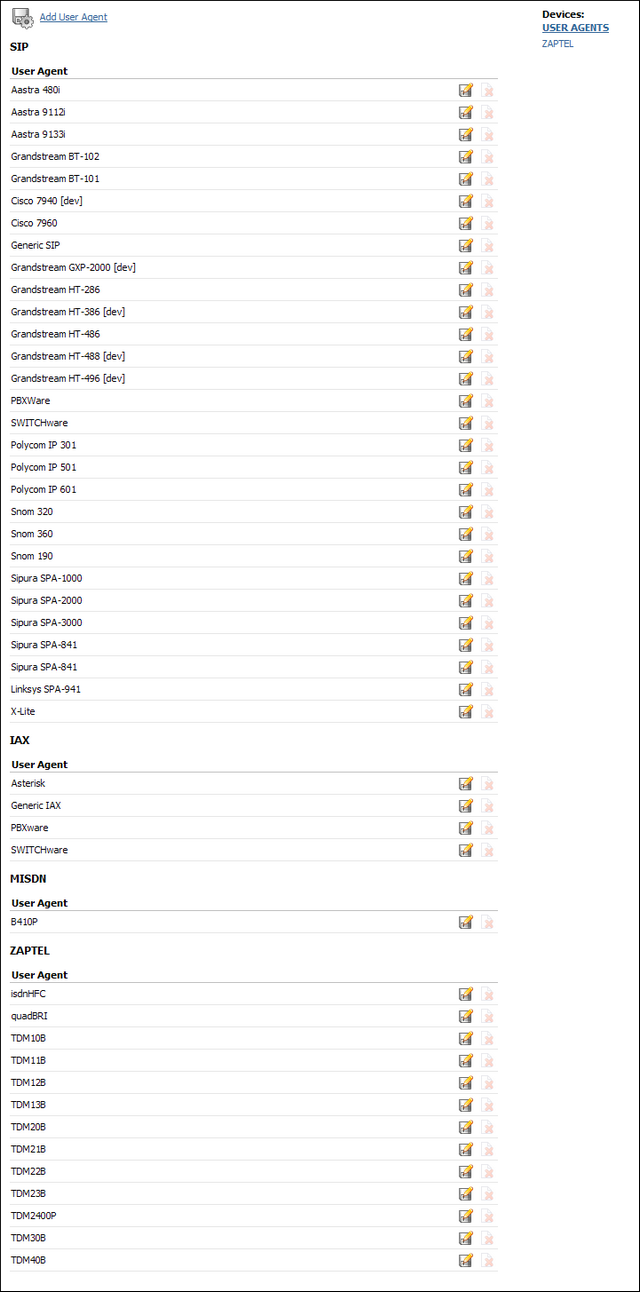
UAD (User Agent Devices) are various IP phones, soft phones, ATA (Analog Telephone Adaptors) and IAD (Integrated Access Devices) used for system extensions. PBXware supports a wide range of UAD using SIP,IAX, MGCP and ZAPTEL protocols.
Supported devices are already pre-configured with most common settings in order to allow administrators an easy way of adding extensions. However, some PBXware installation have a specific requirements hence it is advisable to edit selected UAD and set it to required values. Additionally if an installation needs o use an UAD not listed, clicking on "Add User Agent" allows adding new UAD.
Paging is a service that supports transmitting of messages to multiple phones over their loudspeakers
-
Navigate Internet browser to phone IP address
-
Provide admin password ('admin' by default)
-
Click 'Login' button
-
Click on 'Advanced Settings' link
-
Scroll down to 'Auto-Answer' options
-
Select 'Yes'
-
Click 'Update' button
-
Click 'Reboot' button
| Tip | |
|---|---|
|
Paging tested with Firmware version 1.0.8.16 |
-
Navigate Internet browser to phone IP address
-
Provide admin password ('admin' by default)
-
Click 'Login' button
-
Click on 'Account *' you wish to edit
-
Scroll down to 'Auto-Answer' options
-
Select 'Yes'
-
Click 'Update' button
-
Click 'Reboot' button
| Tip | |
|---|---|
|
Paging tested with Firmware version 1.0.1.12 |
-
Navigate Internet browser to phone IP address
-
Navigate to your line e.g. 'Line 1'
-
Click 'SIP'
-
Set 'Auto Answer' to 'On'
-
Click 'Save' button
-
Navigate to 'Preferences'
-
Set 'Auto Answer Indication' to 'On' for a sound to be played notifying you a call has been received
-
Set 'Type of Answering' to suit your needs e.g. 'Handsfree'
-
Click 'Save' button
| Tip | |
|---|---|
|
Paging tested with Firmware version 5.2b |
You need the latest version of both the SIP software and bootROM to do it. Auto-answer could be configured only using provisioning. To prepare configuration files you have to do following steps:
-
In the 'sip.cfg' file, look for the line with these variables:
<alertInfo voIpProt.SIP.alertinfo.1.value="Auto Answer" voIpProt.SIP.alertInfo.1.class="3"...>
Polycom calls up class 3 in sip.cfg or ipmid.cfg file.
-
In 'sip.cfg' my ring class 'AUTO_ANSWER' looks like this:
<ringType se.rt.enabled="1" se.rt.modification.enabled="1">
<DEFAULT se.rt.1.name="Default" se.rt.1.type="ring" se.rt.1.ringer="2" se.rt.1.callWait="6" se.rt.1.mod="1"/>
<VISUAL_ONLY se.rt.2.name="Visual" se.rt.2.type="visual"/>
<AUTO_ANSWER se.rt.3.name="Auto Answer" se.rt.3.type="answer"/>
<RING_ANSWER se.rt.4.name="Ring Answer" se.rt.4.type="ring-answer" se.rt.4.timeout="2000" se.rt.4.ringer="2" se.rt.4.callWait="6" se.rt.4.mod="1"/>
<INTERNAL se.rt.5.name="Internal" se.rt.5.type="ring" se.rt.5.ringer="2" se.rt.5.callWait="6" se.rt.5.mod="1"/>
<EXTERNAL se.rt.6.name="External" se.rt.6.type="ring" se.rt.6.ringer="2" se.rt.6.callWait="6" se.rt.6.mod="1"/>
<EMERGENCY se.rt.7.name="Emergency" se.rt.7.type="ring" se.rt.7.ringer="2" se.rt.7.callWait="6" se.rt.7.mod="1"/>
<CUSTOM_1 se.rt.8.name="Custom 1" se.rt.8.type="ring" se.rt.8.ringer="5" se.rt.8.callWait="7" se.rt.8.mod="1"/>
<CUSTOM_2 se.rt.9.name="Custom 2" se.rt.9.type="ring" se.rt.9.ringer="7" se.rt.9.callWait="7" se.rt.9.mod="1"/>
<CUSTOM_3 se.rt.10.name="Custom 3" se.rt.10.type="ring" se.rt.10.ringer="9" se.rt.10.callWait="7" se.rt.10.mod="1"/>
<CUSTOM_4 se.rt.11.name="Custom 4" se.rt.11.type="ring" se.rt.11.ringer="11" se.rt.11.callWait="7" se.rt.11.mod="1"/>
</ringType>
'se.rt.3.type="ANSWER"' sets Polycom phone ring type, in this case an answer, that means that phone will automatically answer without ringing.
-
Update modified files to provisioning server
-
Reload PBXware if used as provisioning server
-
Restart phone
The bootROM on the phone performs the provisioning functions of downloading the bootROM, the <Ethernet address>.cfg file, and the SIP application and uploading log files. The SIP application performs the provisioning functions of downloading all other configuration files, uploading and downloading the configuration override file and user directory, downloading the dictionary and uploading log files.
The protocol which will be used to transfer files from the boot server depends on sev-eral factors including the phone model and whether the bootROM or SIP application stage of provisioning is in progress. TFTP and FTP are supported by all SoundPoint and SoundStation phones. The SoundPoint IP 301, 501, 600 and 601 and SoundStation IP 4000 bootROM also supports HTTP while the SIP application supports HTTP1 and HTTPS. If an unsupported protocol is specified, this may result in unex-pected behavior, see the table for details of which protocol the phone will use. The "Specified Protocol" listed in the table can be selected in the Server Type field or the Server Address can include a transfer protocol, for example http://usr:pwd@server (see 2.2.1.3.3 Server Menu on page 10). The boot server address can also be obtained via DHCP. Configuration file names in the <Ethernet address>.cfg file can include a transfer protocol, for example https://usr:pwd@server/dir/file.cfg. If a user name and password are specified as part of the server address or file name, they will be used only if the server supports them.
| Tip | |
|---|---|
|
A URL should contain forward slashes instead of back slashes and should not contain spaces. Escape characters are not supported. If a user name and password are not specified, the Server User and Server Password will be used. |
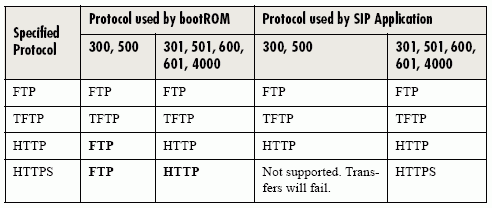
For downloading the bootROM and application images to the phone, the secure HTTPS protocol is not available. To guarantee software integrity, the bootROM will only download signed bootROM or application images. For HTTPS, widely recog-nized certificate authorities are trusted by the phone and custom certificates can be added. See 6.1 Trusted Certificate Authority List on page 151. Using HTTPS requires that SNTP be functional. Provisioning of configuration files is done by the application instead of the bootROM and this transfer can use a secure protocol.
-
Create a new line on a Cisco phone, and put the configuration into sip.conf as you normally would(go into 'Settings: Call Preferences: Auto Answer (intercom)' and then make the line you've just created as 'auto-answer'.
-
Here are the contents of /var/lib/asterisk/agi-bin/callall:
#!/bin/sh
cp /var/lib/asterisk/agi-bin/*conf /var/spool/asterisk/outgoing
-
Make sure to make the script executable. And then for every extension you have as an auto-answer, have a file like this in /var/lib/asterisk/agi-bin:
Channel: SIP/2006
Context: add-to-conference
WaitTime: 2
Extension: start
Priority: 1
CallerID: Office Pager <5555>
So, for example, if you have three lines that are configured for automatic answering - SIP/2006, SIP/2007, SIP/2008, you should have three files named 2006-conf, 2007-conf, 2008-conf in /var/lib/asterisk/agi-bin that get copied into the outgoing call spool directory every time you call extension 5555.
-
Now, dial 5555 from any phone and you should have one-way paging.
People who use the pager may have to get used to waiting 1-2 seconds before speaking to allow all the phones to catch up with the audio stream. All of the phones hang up after 20 seconds, regardless of if the person originating the page has stopped talking. Change the AbsoluteTimeout values to increase this interval.
If you want a really confusing loud mess, then change the "dmq" options to "dq" and you'll get an N-way conversation going with everyone who has a phone. Bad.
If you want a really interesting office surveillance tool, change the "dmq" to "dt" and you'll suddenly be listening to all of the extensions in the office, like some kind of mega-snoop tool. Useful for after-hours listening throughout the entire office.
| Tip | |
|---|---|
|
Paging tested with Firmware version 6.1 |
-
Navigate Internet browser to phone IP address
-
Select 'Admin Login'
-
Select 'Advanced'
-
Navigate to 'User' tab
-
Set 'Auto Answer Page' to 'Yes'
-
Set 'Send Audio To Speaker' to 'Yes'
-
Click 'Submit All Changes' button
| Tip | |
|---|---|
|
At the time paging option is set for all lines and works once handset is picked up. Paging tested with Firmware version 4.1.12(a) |
-
Navigate Internet browser to phone IP address
-
Select 'Preferences' under 'Basic Settings' tab
-
Set 'Microphone Mute' to 'No'
-
Set 'Auto-Answer' to 'Yes'
-
Click 'Save Settings' button
-
Reboot the phone to apply the new settings
| Tip | |
|---|---|
|
At the time paging option is set for all lines and works once handset is picked up. Paging tested with Firmware version 1.3.1.1095 |
Click 'Add User Agent' to add a device or click 'Edit' icon next to one, to change its settings.
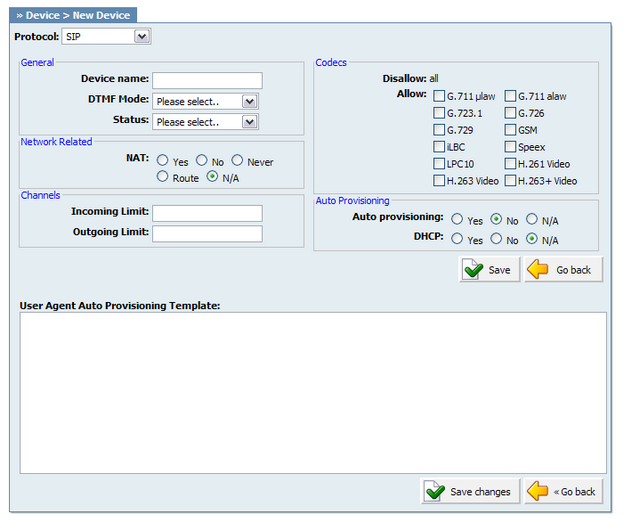
Table 20.47. SIP
Click 'Add User Agent' to add a device or click 'Edit' icon next to one, to change its settings.

Table 20.48. IAX
Click 'Add User Agent' to add a device or click 'Edit' icon next to one, to change its settings.
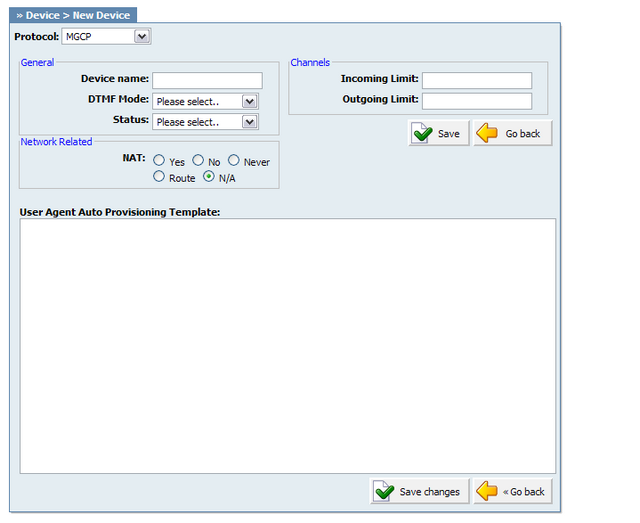
Table 20.49. MGCP
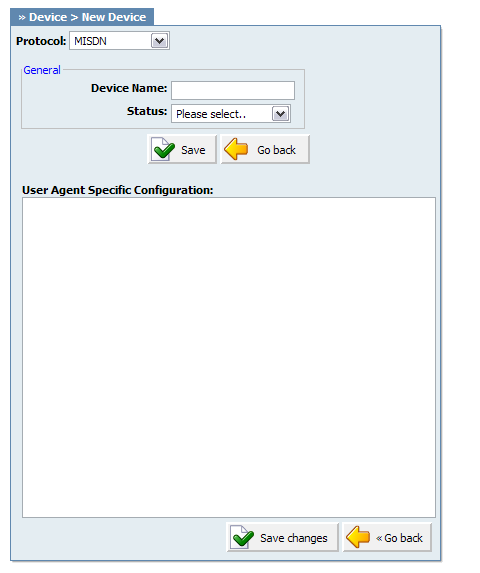
Table 20.50. MISDN

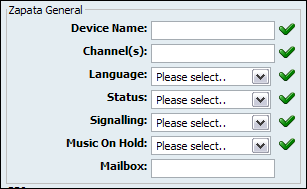
Table 20.51. Zapata General
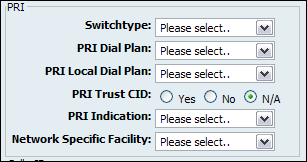
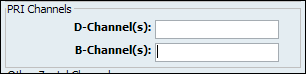
Table 20.52. PRI
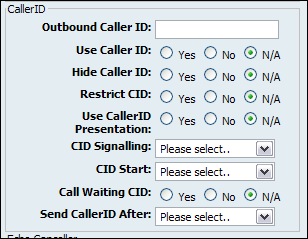
Table 20.53. Caller ID
| Field | Description | Example | Field Type |
|---|---|---|---|
|
Outbound Caller ID: |
Caller ID set for all outbound calls where Caller ID is not set or supported by a device | [email protected] | [0-9] |
|
Caller ID: |
CallerID can be set to 'asreceived' or a specific number if you want to override it. NOTE: Caller ID can only be transmitted to the public phone network with supported hardware, such as a PRI. It is not possible to set external caller ID on analog lines | 'asreceived', 555648788 | [a-z][0-9] |
|
Use Caller ID: |
Whether or not to use caller id | Yes, No, N/A | Options buttons |
|
Hide Caller ID: |
Whether or not to hide outgoing caller ID | Yes, No, N/A | Options buttons |
|
Restrict CID |
Whether or not to use the caller ID presentation for the outgoing call that the calling switch is sending | Yes, No, N/A | Options buttons |
|
CID Signalling: |
Set the type of caller ID signalling |
|
Select box |
|
CID Start: |
What signals the start of caller ID |
|
Select box |
|
Call Waiting CID: |
Whether or not to enable call waiting on FXO lines | Yes, No, N/A | Options buttons |
|
Send CallerID After: |
Some countries, like UK, have different ring tones (ring-ring), which means the caller id needs to be set later on, and not just after the first ring, as per the default. | Yes | Select box |
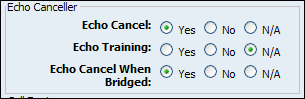
Table 20.54. Echo Canceller
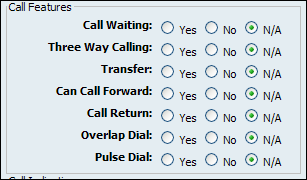
Table 20.55. Call Features
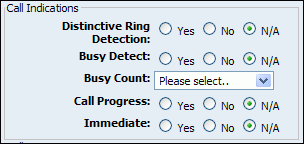
Table 20.56. Call Indications
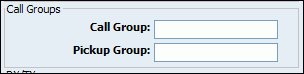
Table 20.57. Call Groups
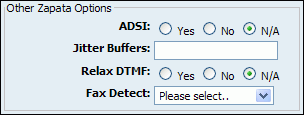
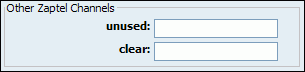
Table 20.59. Other Zapata Options
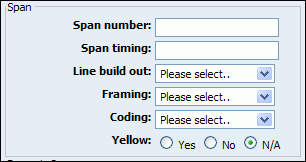
Table 20.60. Span
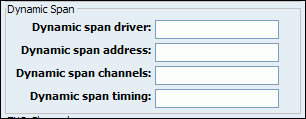
Table 20.61. Dynamic Span
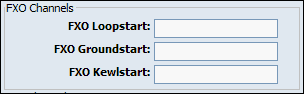
Values for above fields are set as follows:
-
1 - for one card
-
1-2 - for two cards
-
1-3 - for three cards etc
-
2-3 (If your card has modules in this order FXS, FXO, FXO, FXS)
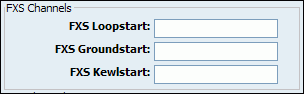
Values for above fields are set as follows:
-
1 - for one card
-
1-2 - for two cards
-
1-3 - for three cards etc
-
2-3 (If your card has modules in this order FXS, FXO, FXO, FXS)