In this chapter we will cover:
System extensions lists all local and remote UADs/Phones connected to the PBXware with the following details:

Table 3.1. Extensions
| Field | Description | Example | Field Type |
|---|---|---|---|
|
Name |
Full name of the user device is registered to |
Peter Doyle |
Display |
|
Extension |
UAD/Phone extension number |
1111 |
Display |
|
User Agent |
UAD/Phone type |
Sipura SPA-841 |
Display |
|
Status |
UAD/Phone system status |
Active/Inactive |
Display |
|
Protocol |
Protocol used by the UAD/Phone |
SIP/IAX |
Display |

|
Edit UAD/Phone configuration |
Button | |

|
Delete UAD/Phone from the system |
Button |
Procedure of adding a new system extension is divided into two steps. In first step UAD/Phone type and extension location needs to be provided.
| Tip | |
|---|---|
|
By default, 'Single Extension' will be created. 'Advanced Options' offer the facility to add multiple extensions as well. For more information check the 'Adding Multi Extensions' chapter. |
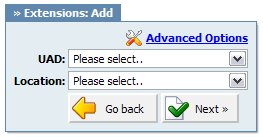
Table 3.2. Add/Edit Extension
In second step, basic UAD/Phone information is set.
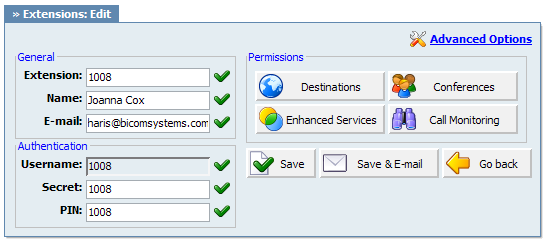
Table 3.3. Add/Edit Extension
| Field | Description | Example | Field Type |
|---|---|---|---|
|
Extension |
System extension number By default, this field is automatically populated, but can be changed to any Extension number. |
Setting '1008' here will create new system extension with the same network number. By default, this field is automatically populated, but can be changed to any Extension number. |
[0-9] |
|
Name |
Full name of the person using the Extension. This name is sent in a Caller ID information |
Setting 'Joanna Cox' here will show this name on other UAD/Phone display when the call is made |
[a-z][0-9] |
|
|
Email address associated with the extension and used for various system notifications |
Setting '[email protected]' here will transfer all Voicemail notifications, Extension PIN and other details to this email |
[a-z][0-9] |
|
Reset Inclusive |
Reset extension inclusive minutes Click on this button and confirm with 'Yes' to reset inclusive minutes. |
Button | |
|
Credit/Debit |
Opens a window for adding extension credit/debit |
Button | |
|
Service Plan |
Service plan applied to extension |
Select among available service plans to apply its rates to extension |
Select box |
|
Username |
Username used by the UAD/Phone for the registration with the PBXware By default, this field is the same as Extension network number and cannot be changed. |
In this case this value is set to '1008'. |
[0-9] |
|
Secret |
Secret/Password used by the UAD/Phone for the registration with the PBXware By default this field is automatically populated, but can be changed to any value |
[a-z][0-9] | |
|
PIN (Personal Identification Number) |
Four digit number used for account authorization. NOTE: This number must always be four (4) digits long |
If PIN for this extension is set to '8474', provide it when asked for it by the PBXware when checking your Voice inbox or other Enhanced Services |
[0-9] |
| Tip | |
|---|---|
|
Search bar filters extensions by name, e-mail and number

Table 3.4. Search Extensions
There are two ways to add multiple extensions to PBXware:
Table 3.5. Adding Multi Extensions
| Manually |
To create a list manually provide details to 'Name', 'Email', 'Ext', 'Secret', 'PIN' [, 'MAC'] fields and clicking the Add(+) icon. |
| Uploading a '.csv' file |
To Upload a '.csv' file:
|
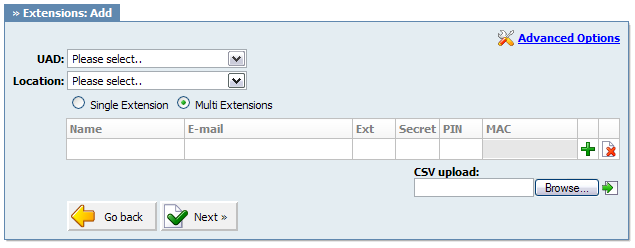
Table 3.6.
| Field | Description | Field Type |
|---|---|---|
| Single/Multiple Extension |
Switch between the single and multi extension adding options |
Option buttons |
The following options are used frequently and are mostly required for normal extension operation. Some of these fields are pre-configured with the default values. It is not recommended to change these unless prompted for doing so while saving the changes.
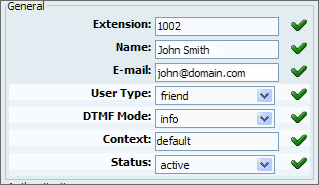
Table 3.7. General Fields
These options are used for UAD/Phone authentication with the PBXware
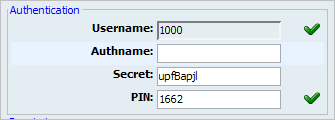
Table 3.8. Authentication
| Field | Description | Example | Field Type |
|---|---|---|---|
|
Username |
Username used by the UAD/Phone for the registration with the PBXware |
By default, this field is the same as extension network number and cannot be changed. In this case this value is set to '1008'. |
[0-9] |
|
Authname |
Name used for authentication with sip provider |
If you set this field to 12345 for example, sent SIP header will look like [email protected] for example |
[0-9] |
|
Secret |
Secret/Password used by the UAD/Phone for the registration with the PBXware |
By default this field is automatically populated, but can be changed to any value |
[a-z][0-9] |
|
PIN (Personal Identification Number) |
Four digit number used for account authorization. NOTE: This number must always be four (4) digits long |
If PIN for this extension is set to '8474', provide it when asked for it by the PBXware when checking your Voice inbox or other 'Enhanced Services' |
[0-9] |
These options are used for billing of incoming and outgoing calls. Extension is assigned to a service plan and its call rates, and additional billing options are set here as well.
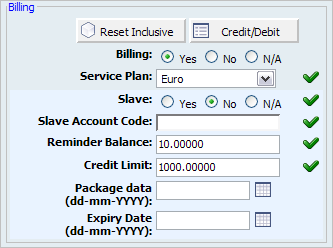
Table 3.9. Billing
This information displays extension's billing information. Amount left, inclusive minutes left etc...
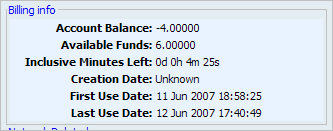
Table 3.10. Billing Info
These options set important network related values regarding NAT, monitoring and security
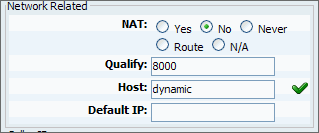
Table 3.11. Network Related
Caller's name and number displayed here are sent to party you call and are shown on their UAD/Phone display. Information you see here is taken from extension number and user name. To set different Caller ID information please go to 'Enhanced services: Caller ID' and set new information there.
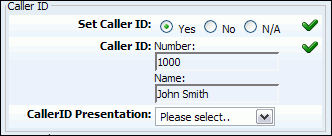
Table 3.12. Caller ID
These options mimic the functions of an answering machine but with many additional features added. Voice messages are saved on central file-system location instead on a UAD/Phone.
Table 3.13. Voicemail usage
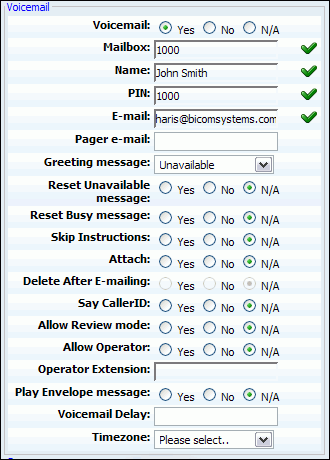
Table 3.14. Voicemail option
| Field | Description | Example | Field Type |
|---|---|---|---|
|
Voicemail: |
Enable the Voicemail service When call is placed and no one picks up the handset after some time, calling party will be transferred to dialed extension voice box and offered to leave a voice message |
Option buttons | |
|
Mailbox: |
Mailbox extension number |
This value is the same as the extension number and cannot be modified |
Readonly |
|
Name: |
Full name of the user associated with the voice box. |
This value is the same as the 'Name' field and cannot be modified. |
[a-z] [0-9] |
|
PIN: (Personal Identification Number) |
Password used for accessing voicemail. The value of this field is set under 'Authentication: PIN'. |
When B wants to access his voicemail, he is asked to authenticate with personal 4(four) digit PIN. |
[0-9] |
|
E-mail: |
E-mail address associated with the voice box. The value of this field is set under 'General: E-mail'. |
When A calls B and leaves a voice message, B will get an email notification about new voice message on this email address. |
[a-z] [0-9] [@._-] |
|
Pager e-mail: |
Pager e-mail address associated with the voice box. |
When A calls B and leaves a voice message, B will get a pager email notification about new voice message on this email address. |
[a-z] [0-9] [@._-] |
|
Greeting message: |
Greeting message played to users upon entering the voice box. |
When A gets to B voice box, the selected 'Greeting message' is played to A before he is allowed to leave a message. |
Select box |
|
Reset Unavailable message: |
Resets the user recorded/uploaded unavailable message. Custom unavailable messages can be recorded through UAD/Phone or uploaded to voice box through 'Self Care'. |
To revert to default system unavailable message select 'Yes' and save the extension settings. |
Option buttons |
|
Reset Busy message: |
Resets the user recorded/uploaded busy message. Custom busy messages can be recorded through UAD/Phone or uploaded to voice box through 'Self Care'. |
To revert to default system busy message select 'Yes' and save the extension settings. |
Option buttons |
|
Skip Instructions: |
Skip the instructions on how to leave a voice message. |
Once user A reaches the dialed voice box, if this option is set to 'Yes', A will hear the 'Greeting message', and then be transferred directly to the 'beep' sound. |
Option buttons |
|
Attach: |
Send the voice message as an attachment to user email. |
Once B gets the new voice message, if this option is set to 'Yes', the message sound file will be attached to the new voicemail notification email. |
Option buttons |
|
Delete After E-mailing: |
Delete voice message after sending it as an attachment to user email. |
Once B gets the new voice message, if this option is set to 'Yes', the message will be deleted from the voice box after it has been emailed to B. |
Option buttons |
|
Say Caller ID: |
Announce the extension number from which the voice message has been recorded. |
If this option is set to 'Yes', when checking voicemail, 'From phone number {$NUMBER}' message will be heard. |
Option buttons |
|
Allow Review mode: |
Allow B to review the voice message before committing it permanently to A's voice box. |
B leaves a message on A's voice box, but instead of hanging up, he presses '#'. Three options are offered to B:
|
Option buttons |
|
Allow Operator: |
Allow B to reach an operator from within the voice box. |
B leaves a message on A's voice box, but instead of hanging up, B presses '#'. 'Press 0 to reach an operator' message played (Once '0' is pressed, user is offered the following options):
|
Option buttons |
|
Operator Extension: |
Local extension number that acts as an operator. |
If A's voice box has an option 'Allow Operator' set to 'Yes', all users dialing '#0' inside the voice box will reach this operator extension. |
[0-9] |
|
Play Envelope message: |
Announces the Date/Time and the Extension number from which the message was recorded. |
Once voice box is checked for new messages, if this option is set to 'Yes', 'Received at {$DATE}. From phone number {$NUMBER}' will be played, giving more details about the message originator. |
Option buttons |
|
Voicemail Delay: |
How long to pause in seconds, before asking user for PIN/Password. |
Some UADs/Phones have tendency to garble the beginning of a sound file. Therefore, user checking the voice box, when asked for password would hear '...sword' instead of 'Password'. Setting this field to 1-2 seconds will provide long enough gap to fix this anomaly. |
[0-9] |
|
Timezone: |
Sets the correct date/time stamp. NOTE: Timezones are taken from '/usr/share/zoneinfo' system directory |
By setting the correct time zone, user would always be notified of the exact date/time voice message was left on their box. Set the correct time zone if user is located in different time zone then PBXware. |
Select box |
These options define who is allowed to pickup our calls, and whose calls we are allowed to pickup.
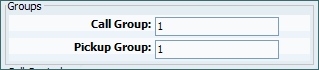
Table 3.15. Groups
Example:
Extension A:
-
Call Group = 1
-
Pickup Group = 3,4
Extension B:
-
Call Group = 2
-
Pickup Group = 1
-
If A is ringing, B can pickup the ringing call by dialing '*8'.
-
If B is ringing, A cannot pickup the ringing call because B's Call Group = 2, and A can pickup only Call Groups 3,4
| Tip | |
|---|---|
|
Grouping works only within a technology(SIP to SIP or IAX to IAX). |
These options set the number of simultaneous incoming and outgoing extension calls.
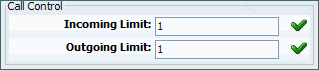
Table 3.16. Call Control
These options enable extension to use custom default trunks for all outgoing calls.
Table 3.17. Trunks
| Field | Description | Field Type |
|---|---|---|
|
Primary/Secondary/Tertiary Trunk: |
Set the default trunks for all routes dialed from this extension. If the connection is not established through the primary, secondary trunk is used etc. Default trunks can be set per extension and on the Default Trunks level. Please look at the 'Precedence' section. |
Select box |
|
Routes: |
Set Extension default trunks 'per Destination/Country provider' (Routes: Example) In case that some countries/providers are to be reached through non primary trunks, or when one of the default trunks needs to be given higher precedence over another, a route may be set for each destination provider. |
Select box |
Precedence
Settings:
-
Default Trunks: All System calls go through trunks defined here
-
MiniLCR: Overrides 'Default Trunks' and sets a specific trunk for a destination
Extensions:
-
Trunks: Overrides 'Settings: Default Trunks'
-
Routes: Overrides 'Settings: MiniLCR'
The list of countries that start with letter 'A' is displayed when you click on a 'A' in the upper navigation. After the countries are listed, click on one of them to see default trunks for their providers. Once default trunk is selected for a provider, all calls made from that extension to set provider will be made using set trunk.
In this chapter we will cover:

These options grant/deny certain local/worldwide destinations, conferences, enhanced services or call monitoring to edited extension.
If the image below is displayed, all destinations are allowed for the user extension. Should extension permissions be changed, click 'Set destinations manually' button.

Manually, destinations are set through the following groups:
-
Remote - E164 PSTN destinations, ITSPs, other VoIP networks etc.
-
Local - All destinations within the system/network (Extensions, IVR, Queues, Conferences...).
-
Other Networks - Other PBX networks we are connected to.
Possible extension permissions to destinations are:
-

Authorized:
-

PIN Required:
-

Not Authorized:
These options grant/deny access to PBXware conferences. Conferences allow multiple users to participate in a conversations simultaneously.

Possible extension permissions to destinations are:
-
Authorized:
-
PIN Required:
-
Not Authorized:
These options apply specific conference rules to user extension.
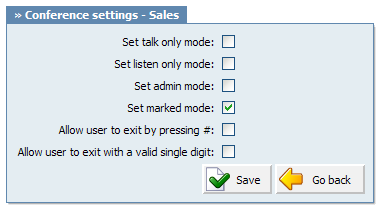
Table 3.18. Edit
In this chapter we will cover:
Precedence
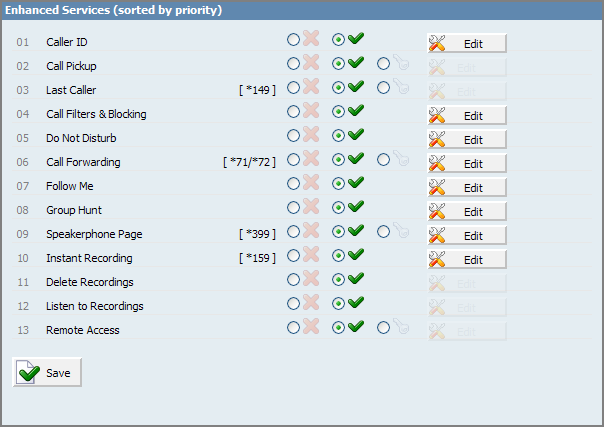
Enhanced services are ordered by priority (marked by numbers 01, 02 ...). Higher the priority equals higher precedence of the enhanced service. For example, due to a similarity of 'Follow Me' and 'Group Hunt' services, if both are enabled, 'Follow Me' will be executed due to higher precedence and not the 'Group Hunt'.
Accessibility
Each service has two or more accessibility options:
-
Unavailable
-
PIN Required
-
Available
Custom Caller ID displayed on UAD/Phone display of the called party. Any information provided here will override default Caller ID (Extension number and user name)
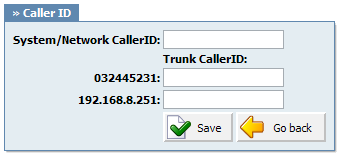
Table 3.19. Caller ID

Example:
Extension A:
-
Call Group = 1
-
Pickup Group = 3,4
Extension B:
-
Call Group = 2
-
Pickup Group = 1
-
If A is ringing, B can pickup the ringing call by dialing '*8'.
-
If B is ringing, A cannot pickup the ringing call because B's call group = 2, and A can pickup only call groups 3,4
| Tip | |
|---|---|
|
Grouping works only within a technology(SIP to SIP or IAX to IAX). |

This service filters and blocks all incoming calls based on a set of rules. For example, calls can be filtered based on whether they are anonymous, belong to specific caller or telemarketer.
| Tip | |
|---|---|
|
Access code for this service can be customized through 'Settings: Access Codes'. |

Table 3.22. Call Filters & Blocking
This service temporarily redirects all incoming calls to set destination number. For example, if you wish not to be disturbed, you may activate this service, Set 'Destination'='Voicemail', enter '1000' in the field bellow and set 'Duration'='1'. This will redirect all calls coming to your extension to voice inbox of the extension 1000.
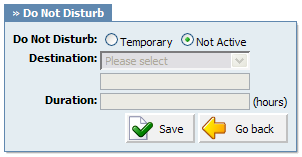
Table 3.23. Do Not Disturb
This service forwards calls to other extensions depending on extension response/status. For example, calls can be forwarded to other extensions(local/remote) or voice boxes unconditionally, or only if extension is busy, when nobody answers the call or when line is unavailable.
| Tip | |
|---|---|
|
Access code for 'Unconditional Call Forwarding' can be customized through 'Settings: Access Codes'. |
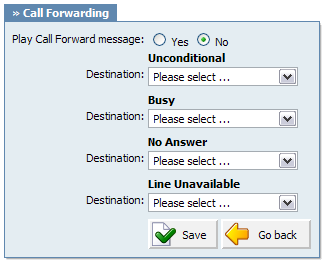
Table 3.24. Call Forwarding
This service rings all provided destinations in a sequence. If call is not answered by any of the provided extensions, call gets transferred to 'Last Destination' extension
Example: For extension 5555 we have set the following extensions under 'Priority' fields: 1000, 1001, 1002 and cell phone 55510205. When someone calls extension 5555, extension 1000 will ring for 'Timeout' number of seconds. If noone answers extensions 1001 is dialled etc. If none of the priority extensions answers the call, 'Last Destination' extension is called.
| Tip | |
|---|---|
|
If placing calls to mobile/proper number it may take 2-3 seconds until call is placed over Zaptel |
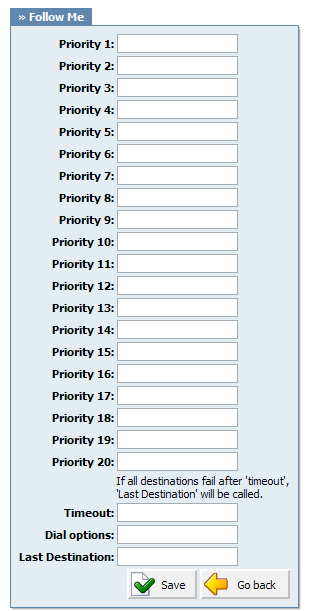
Table 3.25. Follow Me
Dial Options:
-
t - Allow the called user to transfer the call by hitting #
-
T - Allow the calling user to transfer the call by hitting #
-
r - Generate a ringing tone for the calling party, passing no audio from the called channel(s) until one answers. Use with care and don't insert this by default into all your dial statements as you are killing call progress information for the user. Really, you almost certainly do not want to use this. Asterisk will generate ring tones automatically where it is appropriate to do so. 'r' makes it go the next step and additionally generate ring tones where it is probably not appropriate to do so.
-
R - Indicate ringing to the calling party when the called party indicates ringing, pass no audio until answered. This is available only if you are using kapejod's bristuff.
-
m - Provide Music on Hold to the calling party until the called channel answers. This is mutually exclusive with option 'r', obviously. Use m(class) to specify a class for the music on hold.
-
o - Restore the Asterisk v1.0 Caller ID behaviour (send the original caller's ID) in Asterisk v1.2 (default: send this extension's number)
-
j - Asterisk 1.2 and later: Jump to priority n+101 if all of the requested channels were busy (just like behaviour in Asterisk 1.0.x)
-
M(x) - Executes the macro (x) upon connect of the call (i.e. when the called party answers)
-
h - Allow the callee to hang up by dialing *
-
H - Allow the caller to hang up by dialing *
-
C - Reset the CDR (Call Detail Record) for this call. This is like using the NoCDR command
-
P(x) - Use the Privacy Manager, using x as the database (x is optional)
-
g - When the called party hangs up, exit to execute more commands in the current context.
-
G(context^exten^pri) - If the call is answered, transfer both parties to the specified priority; however it seems the calling party is transferred to priority x, and the called party to priority x+1
-
A(x) - Play an announcement (x.gsm) to the called party.
-
S(n) - Hangup the call n seconds AFTER called party picks up.
-
d: - This flag trumps the 'H' flag and intercepts any dtmf while waiting for the call to be answered and returns that value on the spot. This allows you to dial a 1-digit exit extension while waiting for the call to be answered - see also RetryDial
-
D(digits) - After the called party answers, send digits as a DTMF stream, then connect the call to the originating channel.
-
L(x[:y][:z]) - Limit the call to 'x' ms, warning when 'y' ms are left, repeated every 'z' ms) Only 'x' is required, 'y' and 'z' are optional. The following special variables are optional for limit calls: (pasted from app_dial.c)
-
+ LIMIT_PLAYAUDIO_CALLER - yes|no (default yes) - Play sounds to the caller.
-
+ LIMIT_PLAYAUDIO_CALLEE - yes|no - Play sounds to the callee.
-
+ LIMIT_TIMEOUT_FILE - File to play when time is up.
-
+ LIMIT_CONNECT_FILE - File to play when call begins.
-
+ LIMIT_WARNING_FILE - File to play as warning if 'y' is defined. If LIMIT_WARNING_FILE is not defined, then the default behaviour is to announce ('You have [XX minutes] YY seconds').
-
-
f - forces callerid to be set as the extension of the line making/redirecting the outgoing call. For example, some PSTNs don't allow callerids from other extensions than the ones that are assigned to you.
-
w - Allow the called user to start recording after pressing *1 or what defined in features.conf, requires Set(DYNAMIC_FEATURES=automon)
-
W - Allow the calling user to start recording after pressing *1 or what defined in features.conf, requires Set(DYNAMIC_FEATURES=automon)
This service rings all provided destinations at the same time. If call is not answered by any of the provided extensions, call gets transferred to 'Last Destination' extension.
Example: For extension 5555 we have set the following extensions under 'Priority' fields: 1000, 1001, 1002 and cell phone 55510205. When someone calls extension 5555, extension 1000, 1001, 1002 and cell phone 55510204 will ring at the same time for 'Timeout' number of seconds. If noone answers extensions 1001 is dialled etc. If none of the Priority extensions answers the call, 'Last Destination' extension is called.
| Tip | |
|---|---|
|
If placing calls to mobile/proper number it may take 2-3 seconds until call is placed over Zaptel |
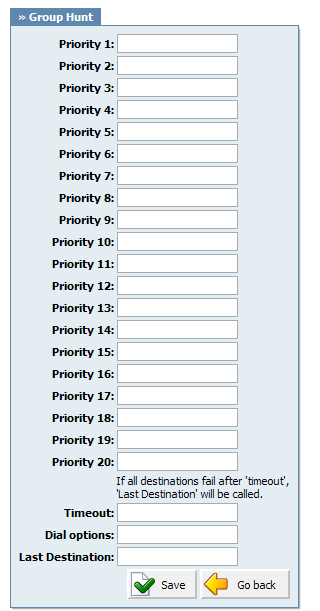
Table 3.26. Group Hunt
Dial Options:
-
t - Allow the called user to transfer the call by hitting #
-
T - Allow the calling user to transfer the call by hitting #
-
r - Generate a ringing tone for the calling party, passing no audio from the called channel(s) until one answers. Use with care and don't insert this by default into all your dial statements as you are killing call progress information for the user. Really, you almost certainly do not want to use this. Asterisk will generate ring tones automatically where it is appropriate to do so. 'r' makes it go the next step and additionally generate ring tones where it is probably not appropriate to do so.
-
R - Indicate ringing to the calling party when the called party indicates ringing, pass no audio until answered. This is available only if you are using kapejod's bristuff.
-
m - Provide Music on Hold to the calling party until the called channel answers. This is mutually exclusive with option 'r', obviously. Use m(class) to specify a class for the music on hold.
-
o - Restore the Asterisk v1.0 Caller ID behaviour (send the original caller's ID) in Asterisk v1.2 (default: send this extension's number)
-
j - Asterisk 1.2 and later: Jump to priority n+101 if all of the requested channels were busy (just like behaviour in Asterisk 1.0.x)
-
M(x) - Executes the macro (x) upon connect of the call (i.e. when the called party answers)
-
h - Allow the callee to hang up by dialing *
-
H - Allow the caller to hang up by dialing *
-
C - Reset the CDR (Call Detail Record) for this call. This is like using the NoCDR command
-
P(x) - Use the Privacy Manager, using x as the database (x is optional)
-
g - When the called party hangs up, exit to execute more commands in the current context.
-
G(context^exten^pri) - If the call is answered, transfer both parties to the specified priority; however it seems the calling party is transferred to priority x, and the called party to priority x+1
-
A(x) - Play an announcement (x.gsm) to the called party.
-
S(n) - Hangup the call n seconds AFTER called party picks up.
-
d: - This flag trumps the 'H' flag and intercepts any dtmf while waiting for the call to be answered and returns that value on the spot. This allows you to dial a 1-digit exit extension while waiting for the call to be answered - see also RetryDial
-
D(digits) - After the called party answers, send digits as a DTMF stream, then connect the call to the originating channel.
-
L(x[:y][:z]) - Limit the call to 'x' ms, warning when 'y' ms are left, repeated every 'z' ms) Only 'x' is required, 'y' and 'z' are optional. The following special variables are optional for limit calls: (pasted from app_dial.c)
-
+ LIMIT_PLAYAUDIO_CALLER - yes|no (default yes) - Play sounds to the caller.
-
+ LIMIT_PLAYAUDIO_CALLEE - yes|no - Play sounds to the callee.
-
+ LIMIT_TIMEOUT_FILE - File to play when time is up.
-
+ LIMIT_CONNECT_FILE - File to play when call begins.
-
+ LIMIT_WARNING_FILE - File to play as warning if 'y' is defined. If LIMIT_WARNING_FILE is not defined, then the default behaviour is to announce ('You have [XX minutes] YY seconds').
-
-
f - forces callerid to be set as the extension of the line making/redirecting the outgoing call. For example, some PSTNs don't allow callerids from other extensions than the ones that are assigned to you.
-
w - Allow the called user to start recording after pressing *1 or what defined in features.conf, requires Set(DYNAMIC_FEATURES=automon)
-
W - Allow the calling user to start recording after pressing *1 or what defined in features.conf, requires Set(DYNAMIC_FEATURES=automon)
Table 3.27. Speakerphone Page
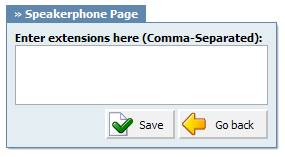
Example: Set this field to '1000,1001,1002' for example. Now dial*399. Extensions 1000,1001,1002 will be paged. If UAD/Phone supports it, the call will automatically go to the speakerphone, otherwise it will just ring
| Tip | |
|---|---|
|
Phones by default have 10 seconds to auto answer. |
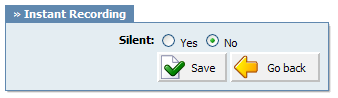
This service enables instant call recording, started anytime during the conversation, by dialing *159. For example, with this service enabled, you may listen to any call made by extension 1000 for example. Simply dial *159 + 1000
| Tip | |
|---|---|
|
Access code for this service can be customized through 'Settings: Access Codes' |
This service enables user to delete recorded calls via 'Self Care: CDR'. For example, with this option enabled, user logs into self care, navigates to 'CDR', selects recorded message and clicks on 'Advanced: Delete Recordings'

This service enables user to listed recorded calls via 'Self Care: CDR'. For example, with this option enabled, user logs into Self Care, navigates to 'CDR', selects recorded message and clicks on 'Listen' button. Selected sound file will be downloaded to local computer from where it can be played in preferred audio player

This service enables user access system from remote location. For example, IVR '1001' has the following options set, '4'='Remote access', 'Extensions'='Destination'. Once remote user enters the IVR through the trunk and DID, he will press '4', type in his extension number and PIN number (both confirmed with '#') and dial any local, mobile or proper number.

This service monitors active calls in real time.
For example, extensions 1000 and 1001 are in conversation. Extension 1005 dials '*199 1000'. From that moment, active call and all other calls made by extension 1000 will be monitored by extension 1005, until 1005 hangs up.
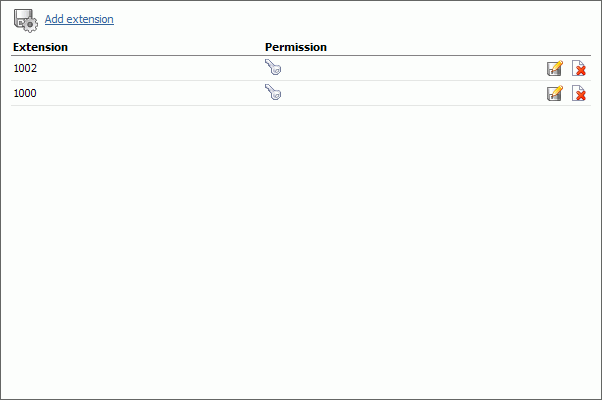
Click 'Add extension' button to add extension to monitoring list
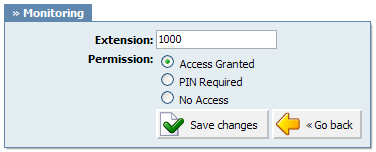
Table 3.29. Add/Edit
These options enable PBXware to automatically provision UAD/Phone. Configuration files are downloaded from PBXware's TFTP server
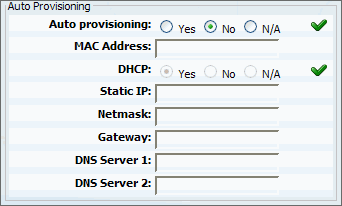
Table 3.30. Auto Provisioning
These options fine-tune incoming/outgoing call settings.
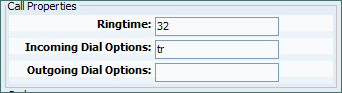
Table 3.31. Call Properties
Dial Options:
-
t - Allow the called user to transfer the call by hitting #
-
T - Allow the calling user to transfer the call by hitting #
-
r - Generate a ringing tone for the calling party, passing no audio from the called channel(s) until one answers. Use with care and don't insert this by default into all your dial statements as you are killing call progress information for the user. Really, you almost certainly do not want to use this. Asterisk will generate ring tones automatically where it is appropriate to do so. 'r' makes it go the next step and additionally generate ring tones where it is probably not appropriate to do so.
-
R - Indicate ringing to the calling party when the called party indicates ringing, pass no audio until answered. This is available only if you are using kapejod's bristuff.
-
m - Provide Music on Hold to the calling party until the called channel answers. This is mutually exclusive with option 'r', obviously. Use m(class) to specify a class for the music on hold.
-
o - Restore the Asterisk v1.0 Caller ID behaviour (send the original caller's ID) in Asterisk v1.2 (default: send this extension's number)
-
j - Asterisk 1.2 and later: Jump to priority n+101 if all of the requested channels were busy (just like behaviour in Asterisk 1.0.x)
-
M(x) - Executes the macro (x) upon connect of the call (i.e. when the called party answers)
-
h - Allow the callee to hang up by dialing *
-
H - Allow the caller to hang up by dialing *
-
C - Reset the CDR (Call Detail Record) for this call. This is like using the NoCDR command
-
P(x) - Use the Privacy Manager, using x as the database (x is optional)
-
g - When the called party hangs up, exit to execute more commands in the current context.
-
G(context^exten^pri) - If the call is answered, transfer both parties to the specified priority; however it seems the calling party is transferred to priority x, and the called party to priority x+1
-
A(x) - Play an announcement (x.gsm) to the called party.
-
S(n) - Hangup the call n seconds AFTER called party picks up.
-
d: - This flag trumps the 'H' flag and intercepts any dtmf while waiting for the call to be answered and returns that value on the spot. This allows you to dial a 1-digit exit extension while waiting for the call to be answered - see also RetryDial
-
D(digits) - After the called party answers, send digits as a DTMF stream, then connect the call to the originating channel.
-
L(x[:y][:z]) - Limit the call to 'x' ms, warning when 'y' ms are left, repeated every 'z' ms) Only 'x' is required, 'y' and 'z' are optional. The following special variables are optional for limit calls: (pasted from app_dial.c)
-
+ LIMIT_PLAYAUDIO_CALLER - yes|no (default yes) - Play sounds to the caller.
-
+ LIMIT_PLAYAUDIO_CALLEE - yes|no - Play sounds to the callee.
-
+ LIMIT_TIMEOUT_FILE - File to play when time is up.
-
+ LIMIT_CONNECT_FILE - File to play when call begins.
-
+ LIMIT_WARNING_FILE - File to play as warning if 'y' is defined. If LIMIT_WARNING_FILE is not defined, then the default behaviour is to announce ('You have [XX minutes] YY seconds').
-
-
f - forces callerid to be set as the extension of the line making/redirecting the outgoing call. For example, some PSTNs don't allow callerids from other extensions than the ones that are assigned to you.
-
w - Allow the called user to start recording after pressing *1 or what defined in features.conf, requires Set(DYNAMIC_FEATURES=automon)
-
W - Allow the calling user to start recording after pressing *1 or what defined in features.conf, requires Set(DYNAMIC_FEATURES=automon)
These options allow caller to use UAD in a public announce system. If UAD fully supports this service, call is accepted automatically and put on a loudspeaker.
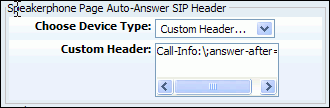
Table 3.32.
Codecs are used to convert analog to digital voice signals and vice versa. These options set preferred codecs used by the extension.
| Tip | |
|---|---|
|
If some of the desired codecs is disabled (cannot be selected), navigate to 'Settings: Servers: Edit: Default Codecs' and enable them under the 'Local' group. |
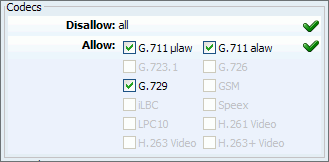
Table 3.33.
Codecs:
-
ITU G.711 ulaw - 64 Kbps, sample-based, used in US
-
ITU G.711 alaw - 64 Kbps, sample-based, used in Europe
-
ITU G.723.1 - 5.3/6.3 Kbps, 30ms frame size
-
ITU G.726 - 16/24/32/40 Kbps
-
ITU G.729 - 8 Kbps, 10ms frame size
-
GSM - 13 Kbps (full rate), 20ms frame size
-
iLBC - 15Kbps,20ms frame size: 13.3 Kbps, 30ms frame size
-
Speex - 2.15 to 44.2 Kbps
-
LPC10 - 2.5 Kbps
-
H.261 Video - Used over ISDN lines with resolution of 352x288
-
H.263 Video - Low-bit rate encoding solution for video conferencing
-
H.263+ Video - Extension of H.263 that provides additional features that improve compression over packet switched networks.
This group of options is used for recording of all incoming/outgoing calls.
| Tip | |
|---|---|
|


Table 3.34. Recording
Disk Space Used By Call Recording
With continuously tone 60 seconds:
-
wav49 = 84.5kb
-
wav = 833.0kb
-
gsm = 85.0kb
With continuously silent tone (without sound) 60 seconds:
-
wav49 = 84.0kb
-
wav = 827.0kb
-
gsm = 84.0kb
This option enables simple notification of device presence.
Supported UADs:
-
Snom 190(Firmware >= 3.60s), 320/360(Firmware >= 4.1)
-
Polycom IP30x/IP50x/IP600
-
Xten EyeBeam
-
Grandstream GXP2000 (Firmware >= 1.0.1.13)
-
Aastra 480i
-
Aastra 9133i
CLI:
> show hints
-= Registered Asterisk Dial Plan Hints =-
1009                : SIP/1009             State:Idle              Watchers  0
2001                : SIP/2001             State:Idle              Watchers  0
1020                : SIP/1020             State:InUse             Watchers  0
1016                : SIP/1016             State:Unavailable       Watchers  0
1008                : SIP/1008             State:Idle              Watchers  0
1006                : SIP/1006             State:Unavailable       Watchers  0
1000                : SIP/1000             State:Ringing           Watchers  0
1003                : SIP/1003             State:Unavailable       Watchers  0
1030                : SIP/1030             State:Unavailable       Watchers  0
1234                : IAX2/1234            State:Unavailable       Watchers  0
7777                : IAX2/7777            State:Idle              Watchers  0
1017                : IAX2/1017            State:Unavailable       Watchers  0
----------------
- 12 hints registered

This option allows adding of additional settings to auto-provisioning template. Auto-provisioning settings are generally defined in the 'Settings: UAD' and are custom set for each device.
NOTE: Unless absolutely sure, do not change or add to this template.
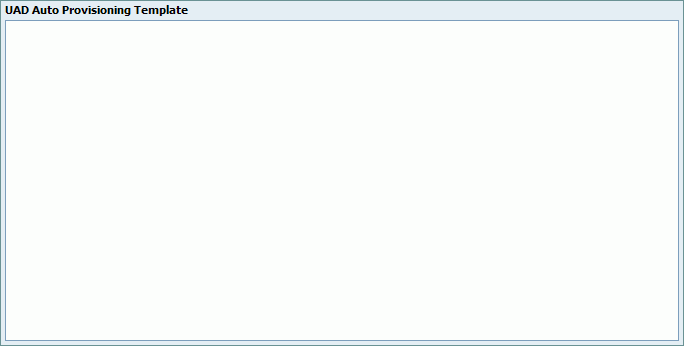
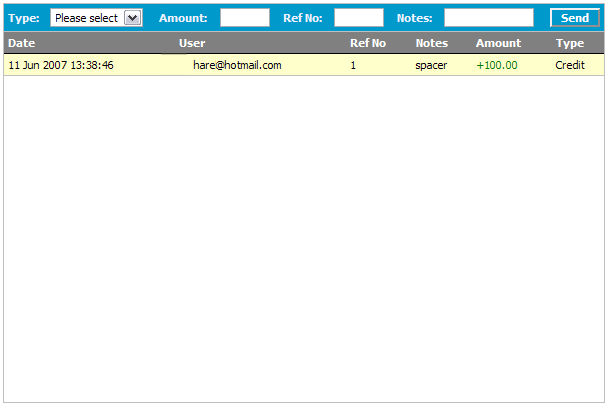
Table 3.36. Credit/Debit
Once funds are added, following details will be displayed:
-
Date: Time and date of the payment
-
User: Username used for login into system of the user who added the funds
-
Ref No: Billing reference number
-
Notes: Additional billing notes
-
Amount: Amount of funds added
-
Type: Billing type