Setup Wizard is designed to collect essential data in order to get system up and running. After the setup wizard has finished the system should be fully licensed, fully operational and ready for use.
In order to login into the setup wizard please point browser to: https://$IPADDRESS:81/ (For Example:https://192.168.1.2:81/)
In this chapter we will cover:
![[Important]](images/icons/important.png) |
Important |
|
Setup wizard has security username/password in order to prevent unauthorized access. Defaults are: username: root , password: pbxware . Setup wizard will ask for the password to be changed in one of the setup steps. After it is changed, It is very important to remember this password since it is system root and setup wizard password.
|
|
Important |
|
Setup wizard has security username/password in order to prevent unauthorized access. Defaults are: username: root , password: pbxware . Setup wizard will ask for the password to be changed in one of the setup steps. After it is changed, It is very important to remember this password since it is system root and setup wizard password.
|
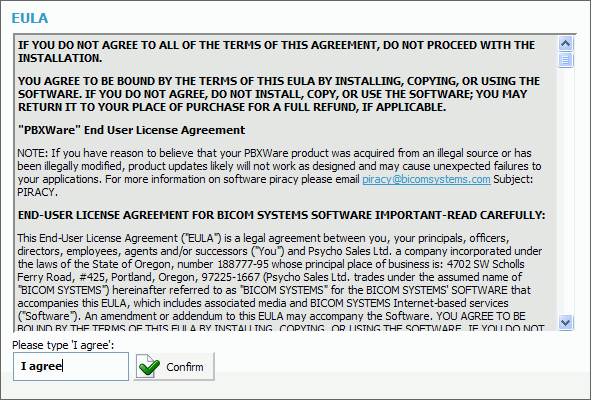
EULA (end user license agreement) is the first setup wizard step. Please read the EULA and type "I agree" to proceed.
If not agreeing with EULA, please remove the installation media, remove system software and return license issued.
![[Tip]](images/icons/tip.png) |
Tip |
|
This field is available for: Virtual Server, VMWare, CD, Appliance PBXware packages
|
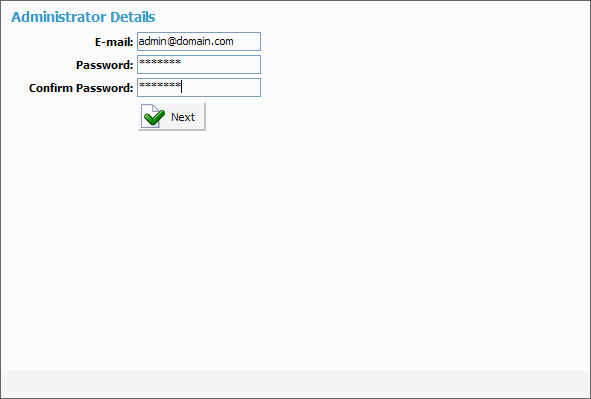
Provide details of user who will administer the system. These values are used when login into the PBXware
|
Tip |
|
This field is available for: Virtual Server, VMWare, CD, Appliance PBXware packages
|
Table 1.1. Administrator Details
| Field |
Description |
Field Type |
|
Email:
|
Provided email address is used as a username for logging into system
|
[a-z] [0-9] [@_.-] |
|
Password/Confirm Password:
|
Provided password is used for logging into system
|
[a-z] [0-9] |
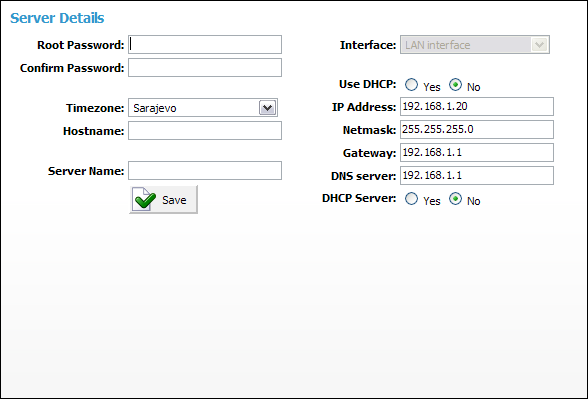
These are system and network fields necessary for proper system operation.
|
Tip |
|
This field is available for: VMWare PBXware packages
|
Table 1.2. System Details
| Field |
Description |
Example |
Field Type |
|
Root Password:
|
PBXware prompts for this password during the system/ssh login and when accessing system services through interface
|
|
[a-z][0-9] |
|
Confirm Password:
|
Re-type the Root Password entered in the field above
|
|
[a-z][0-9] |
|
Time zone:
|
Select the appropriate time zone, PBXware is located at
|
|
Select box |
|
Hostname:
|
The name given to machine which will identify the system on the network
|
myhost |
[a-z][0-9] |
|
Interface:
|
Interface PBXware uses (LAN/WAN)
If the PBXware is in LAN interface, select it here. In some cases where PBXware is installed on appliances in WAN mode, select WAN here
|
|
Select box |
|
Use DHCP:
|
Is PBXware using DHCP or static IP address
It is recommended to always set PBXware on static IP address
|
Set this option to 'No' |
Option buttons |
|
IP Address:
|
If PBXware is in the LAN provide its static IP address here
|
|
[0-9] |
|
Netmask:
|
IP address netmask
|
This field is calculated automatically
|
[0-9] |
|
Gateway:
|
IF PBXware is located in LAN, set the gateway IP address here
|
192.168.1.1
|
[0-9] |
|
DNS server:
|
If PBXware is located in LAN, set the preferred DNS server IP address here
|
192.168.1.1
|
[0-9] |
|
DHCP Server:
|
Should PBXware start its own DHCP server
If there is no DHCP server on LAN, PBXware can start its own and provide UADs/Phones with this service
|
|
[0-9] |
These are system and network fields necessary for proper system operation
|
Tip |
|
This field is available for: CD PBXware packages
|
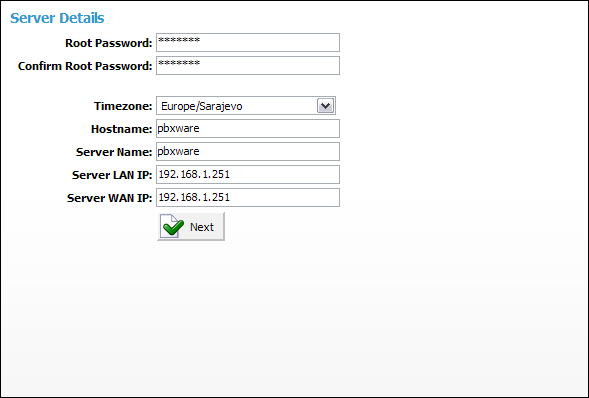
Table 1.3. Server Details
| Field |
Description |
Example |
Field Type |
|
Root Password:
|
PBXware prompts for this password during the system/ssh login and when accessing system services through interface
|
|
[a-z][0-9] |
|
Confirm Password:
|
Re-type the Root Password entered in the field above
|
|
[a-z][0-9] |
|
Time zone:
|
Select the appropriate time zone, PBXware is located at
|
USA/East-coast |
Select box |
|
Hostname:
|
The name given to machine which will identify the system on the network
|
myhost |
[a-z][0-9] |
|
Use DHCP:
|
Is PBXware using DHCP or static IP address
It is recommended to always set PBXware on static IP address
|
Set this option to 'No' |
Option buttons |
|
IP Address:
|
If PBXware is in the LAN provide its static IP address here
|
|
[0-9] |
|
Netmask:
|
IP address netmask
|
This field is calculated automatically
|
[0-9] |
|
Gateway:
|
If PBXware is located in LAN, set the gateway IP address here
|
192.168.1.1
|
[0-9] |
|
DNS server:
|
If PBXware is located in LAN, set the preferred DNS server IP address here
|
192.168.1.1
|
[0-9] |
|
DHCP Server:
|
Should PBXware start its own DHCP server
If there is no DHCP server on LAN, PBXware can start its own and provide UADs/Phones with this service
|
|
[0-9] |
These are system and network fields necessary for proper system operation
|
Tip |
|
This field is available for: Virtual Server PBXware packages
|
Table 1.4. Server Details
| Field |
Description |
Example |
Field Type |
|
Root Password:
|
PBXware prompts for this password during the system/ssh login and when accessing system services through interface
|
[a-z][0-9] |
|
|
Confirm Password:
|
Re-type the Root Password entered in the field above
|
[a-z][0-9] |
|
|
Time zone:
|
Select the appropriate time zone, PBXware is located at
|
USA/East-coast |
Select box |
|
Hostname:
|
The name given to machine which will identify the system on the network
|
myhost |
[a-z][0-9] |
|
Server name:
|
Virtually same as the 'Hostname' field, only this name will appear during system notifications, sent emails etc.
|
domain.com |
[a-z][0-9] |
These are system and network fields necessary for proper system operation
|
Tip |
|
This field is available for: Appliance PBXware packages
|
Table 1.5. Server Details
| Field |
Description |
Example |
Field Type |
|
Root Password:
|
PBXware prompts for this password during the system/ssh login and when accessing system services through interface
|
[a-z][0-9] |
|
|
Confirm Password:
|
Re-type the Root Password entered in the field above
|
[a-z][0-9] |
|
|
Chroot Time zone:
|
Select the appropriate time zone, PBXware is located at
|
USA/East-coast |
Select box |
|
Hostname:
|
The name given to machine which will identify the system on the network
|
myhost |
[a-z][0-9] |
|
Server name:
|
Virtually same as the 'Hostname' field, only this name will appear during system notifications, sent emails etc.
|
domain.com |
[a-z][0-9] |
|
Use DHCP:
|
Is PBXware using DHCP or static IP address
It is recommended to always set PBXware on static IP address
|
Set this option to 'No' |
Option buttons |
|
IP Address:
|
If PBXware is in the LAN provide its static IP address here
|
|
[0-9] |
|
Netmask:
|
IP address netmask
|
This field is calculated automatically
|
[0-9] |
|
Gateway:
|
If PBXware is located in LAN, set the gateway IP address here
|
192.168.1.1
|
[0-9] |
|
DNS server:
|
If PBXware is located in LAN, set the preferred DNS server IP address here
|
192.168.1.1
|
[0-9] |
|
Start DHCP Server:
|
If there is no DHCP server on LAN, PBXware can start its own and provide UADs/Phones with this service
|
|
[0-9] |
Licensing offers entering of a valid non active license and displays MAC address to which license will be valid with. If the system has more then one network adapter all found MACs will be shown for selection.
|
Tip |
|
This field is available for: Virtual Server, VMWare, CD, Appliance PBXware packages
|
Table 1.6. Licensing
| Field |
Description |
Field Type |
|
License Number
|
Enter the PBXware license number, select the MAC address if more then one is present and click 'Next' to register the PBXware
|
[a-z][0-9] |
|
MAC:
|
MAC address associated with the PBXware. NOTE: System must have access to fully operational Internet connection in order to license the system
If more then one MAC address is present, select the one you whish to associate to PBXware and click 'Next'
|
Select box |
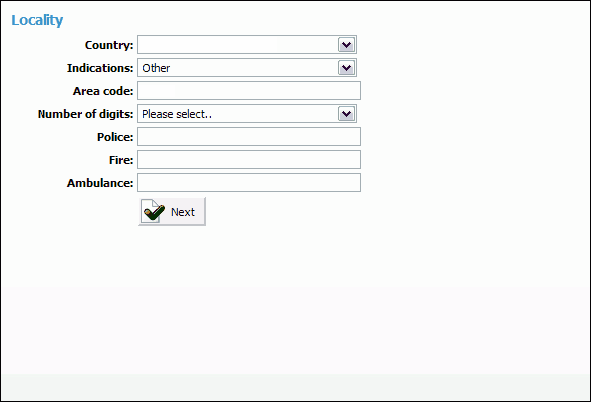
Locality allows for system 'local' values to be entered in order to setup all the necessary values for normal system operation
|
Tip |
|
This field is available for: Virtual Server, VMWare, CD, Appliance PBXware packages
|
Table 1.7. Locality
| Field |
Description |
Example |
Field Type |
|
Country:
|
Select the country PBXware is located at
|
United Kingodm
|
Select box |
|
Indications:
|
Typical telephony sounds PBXware will use
Different signal is heard when handset is picked up in different countries.
|
This field will be set automatically. If your country is not present select 'Other'
|
Select box |
|
Area Code:
|
Area code of the city where PBXware is located
|
If this PBXware is in New York, set '212' here
|
[0-9] |
|
Number Of Digits:
|
Number of digits PBXware will associate with local extensions
|
If this field is set to '4', all local extensions will have a range from 1000-9999
|
[0-9] |
|
Police/Fire/Ambulance:
|
Number of Emergency Services in area where PBXware is located
PBXware has an option to dial these emergency services through certain trunks. If all trunk channels are busy, an active call will get dropped in order to dial these
|
If in USA for example, set these fields to '911'.
|
Select box |
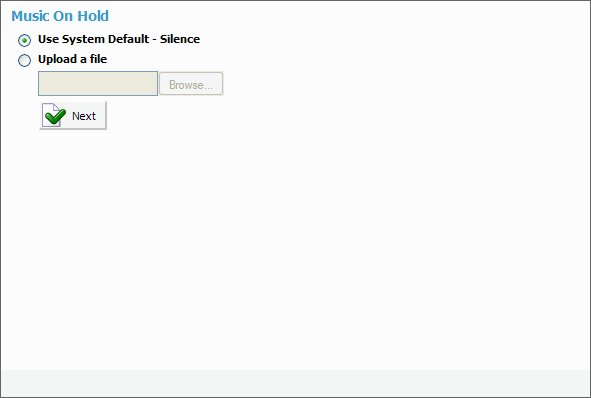
System comes with default 'silence' music on hold sound file or custom sound file can be uploaded. This file must be in .wav, gsm or mp3 format and not bigger then 8MB.
|
Tip |
|
This field is available for: Virtual Server, VMWare, CD, Appliance PBXware packages
|
Table 1.8. Music On Hold
| Field |
Description |
Example |
Field Type |
|
Upload a file
|
Upload a custom sound file from Desktop to PBXware server. NOTE: If you select 'Use System Default - Silence' no sound file will be uploaded and only 'Silence' file will exist in the 'System: MOH'
|
Select this option and click the 'Browse' button to select a file on your Desktop and click 'Next' button to upload it on the PBXware.
|
Select box |
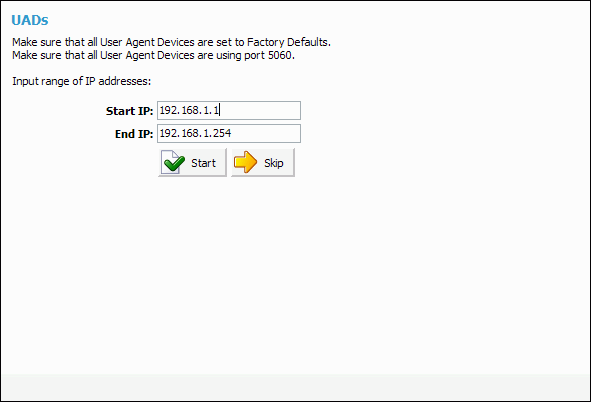
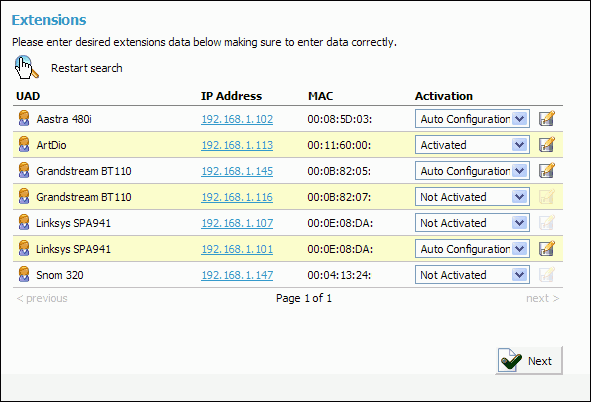
UAD step allows an installer to search the network for supported devices. PBXware will automatically scan the network, list all devices found and offer auto configuration
|
Tip |
|
Please make sure that all User Agent Devices are reset to Factory Defaults and using port 5060 before continuing. This field is available for: Virtual Server, VMWare, CD, Appliance PBXware packages
|
Table 1.9. UAD
| Field |
Description |
Example |
Field Type |
|
Start IP:
|
Start the search from this IP address
|
192.168.1.1
|
[0-9] |
|
End IP:
|
End the search with this IP address
|
192.168.1.254
|
[0-9] |
|
Start:
|
Enter the Start and End IP address and click this button to perform the search
|
|
Command Button |
|
Skip:
|
Skip the search for UADs/Phones on local network and proceed to next Setup Wizard step
|
|
Command Button |
After selecting 'default' UAD this step offers extension fields in order to add multiple users extensions.
Table 1.10. Extensions
| Field |
Description |
Example |
Field Type |
|
UAD:
|
Name of the UAD/Phone found in the local network
|
Aastra 480i
|
Display |
|
IP Address:
|
IP address of the UAD/Phone found in the local network
|
If the phone is located on the 192.168.1.102 IP address that address will be displayed here. Click it to open the UAD/Phone settings in new browser window
|
Display |
|
MAC:
|
Mac address of the UAD/Phone found in the local network
|
00:0B:27:22:08
|
Display |
|
Activation:
|
Set the preferred activation method. NOTE: If UAD/Phone supports the 'Auto Configuration' option
|
-
Not Activated: Skip/Do not configure this UAD/Phone
-
Activated: Creates the PBXware extension and nothing else
-
Auto Provisioning: Creates PBXware extension and a file in TFTP directory for provisioning. This step requires manual reboot of a device
-
Auto Configuration: Creates PBXware extension and a TFTP provisioning file. Goes into web interface of the phone, automatically configures all details and reboot the device'
|
Display |
|
|
Edit the UAD/Phone configuration
Click to edit UAD configuration
|
|
Button |
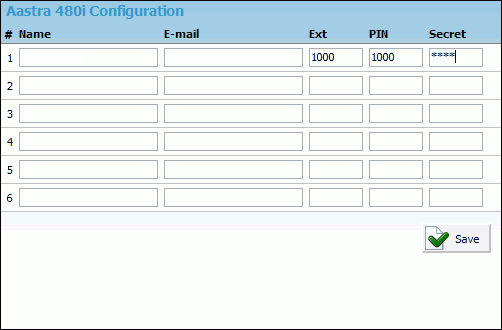
Add system extension for all UAD lines from this location by filling in the following fields:
|
Tip |
|
Number of extensions may vary from one phone to another
|
Table 1.11. Edit
| Field |
Description |
Example |
Field Type |
|
Name:
|
Name of the user associated with the extension. This name will be used as a Caller ID information when calling
|
John Smith
|
[a-z][0-9] |
|
E-mail:
|
Email address associated with the extension. This email is used for system notification and logging into the Self Care
|
[email protected]
|
[a-z][0-9] |
|
Ext:
|
Network number
|
1001
|
[0-9] |
|
PIN (Personal Identification Number):
|
Password used for accessing voicemail and other additional PBXware services.
|
When B wants to access his 'Voicemail', he is asked to authenticate with personal 4(four) digit PIN.
|
[0-9] |
|
Secret:
|
Password used for the UAD/Phone authentication with the PBXware.
|
This fields is auto-generated and consists of letters and digits, but you can change this values
|
[a-z] [0-9] |
Trunks step will try to detect supported trunk devices present on the system. Once detected, wizard will automatically create a trunk based on most common configuration values. Please visit www.bicomsystems.com/docs/uad/ for a list of currently suppored devices.
|
Tip |
|
This field is available for: Virtual Server, VMWare, CD, Appliance PBXware packages
|
Table 1.12. Trunk
| Field |
Description |
Example |
Field Type |
|
Detected devices:
|
If setup wizard detects any hardware devices (cards) they will be listed here
|
|
Display |
|
Default Destination:
|
If PBXware has no DIDs set, all incoming call will go to this destination
|
Set '1000' for example to make all calls coming from trunks to go to this extension
|
[0-9] |
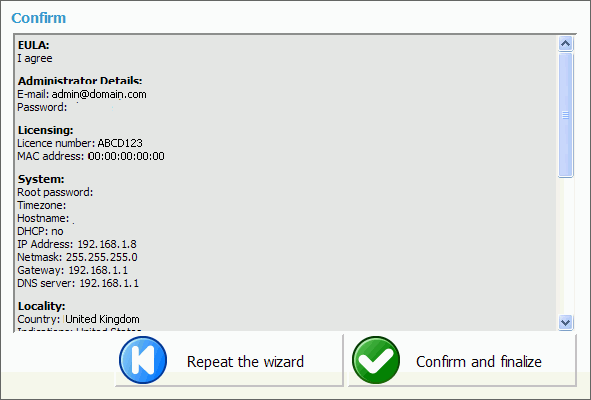
Finally, the confirmation step allows for all values to be revised and to either finish the wizard or start all over from the beginning. If 'Confirm and finalize' is clicked on, setup wizard will finish and browser will be redirected to system login screen.
|
Tip |
|
This field is available for: Virtual Server, VMWare, CD, Appliance PBXware packages
|
Table 1.13. Confirmation
| Field |
Description |
Example |
Field Type |
|
Repeat the wizard
|
All provided details will be reset and started again from the step one
|
Click this button to repeat the wizard
|
Command button |
|
Confirm and finalize
|
All provided details will be applied and setup wizard will redirect to PBXware login screen
|
Confirm the date provided in the setup wizard and finalize the installation
|
Command button |