IVR

This screen lists all system standard DIDs with the following details:

Table 7.1. IVR

Field Description Example Field Type

Name:

IVR name

Welcome Display

Number:

IVR network number

1010 Display

Edits the IVR configuration

Click to edit IVR configuration Button

Deletes an IVR from the system

Click to delete an IVR from the system Button


Search

By selecting 'Search' Command, search menu will be displayed. Searches can be done by Name and Number

Table 7.2. Search

Field Description Example Field Type

Search:

Search phrase

Provide a search phrase here and hit enter to filter the records

[a-z][0-9]

Name:

Should search filter be applied to IVR names

Check the box to search IVR names Check box

Number:

Should search filter be applied to IVR numbers

Check the box to search IVR numbers Check box


Add/Edit IVR

A click on 'Add/Edit' button will open standard IVR options

[Tip] Tip

Make sure to create a greeting sound before adding a new IVR. You may create one by dialing '*301' from your UAD/Phone or by uploading a custom sound file from your computer through 'System: Sounds'

Table 7.3. Add/Edit IVR

Field Description Example Field Type

Name:

Unique IVR identifier/name

This name will be displayed once IVRs are accessed [a-z][0-9]

Number:

Unique network IVR number

This number is to be dialed in order to access the IVR

[0-9]

Greeting:

Greeting sound file

Once user enters the IVR, a greeting with instructions is played(e.g. 'Welcome. For Sales Press 1...'). Select the greeting file played by this IVR here.

NOTE: Greeting file name must start wit 'greeting-***'. To record a custom greeting message dial '*301' from your extension. Newly recorded greeting file will have the current date stamp in the title(e.g. 'greeting-Apr-14-2006-16-32').

Select box

IVR Type:

Set the proper IVR type

PBXware works with two type of IVRs: Single and Multi digit ones. Single digit IVR is used for small range of options(0-9). Multi digit IVR support between(10-9999999999) and is shared with all Multi Digit IVRs.

Select box

Destination:

Set the proper destination for each digit pressed

Once a greeting message(e.g. 'Press 1 for Sales') is played to user, provide the valid destination where the call is to go to once 1 is pressed. If John from sales department is to be dialed, select 'Extension' in this field. If you wish to provide additional options to caller, you can point him to another IVR with its set of options by selecting 'IVR' here.

Select box

Extension:

This field further describes the 'Destination' field. In case 'Remote Access' or 'Queue' are selected under 'Destination', a predefined options will be available for selection under this option.

In the example above we have set the PBXware destination. In this option we set which destination part is to be dialed exactly. If 'Destination'='Extension', provide the extension number here. If 'Destination'='IVR' provide the IVR number here etc...

[0-9]


Table 7.4. Destination Types

Field Description Example Field Type

IVR

Destination for this selection is IVR with number entered into Extension field

401 [0-9]

Queue

Destination for this selection is Queue which is selected from Extension select box

Queue 1

Select box

Conference

Destination for this selection is Conference with number entered into Extension field

500 [0-9]

Extension

When Extension is selected, destination for this selection is Extension with number entered into Extension field

198 [0-9]

Voicemail

With this option selected, you can leave voicemail to specified extension

198 [0-9]

Directory

With this option selected, you will have the ability to dial an extension by entering first three letters of extensions last name if it is provided


Remote Access

This option enables you to remotely access one of four available types of destinations

  • Agent Login - enables remote login as an agent

  • Destinations - enables one to dial any destination

  • Destinations (CallerID) - same as Destinations except that you can set CallerID

  • Voicemail - remotely login to Voicemail

Select box

Fax to E-mail

When user chooses this option his fax then can be sent as an E-mail to number provided in Extension field

222 [0-9]


When you click on the Options button you will get following window with two or three options, depending on Destination selection

Table 7.5. Options for digit #

Field Description Example Field Type

Caller ID:

Overrides the incoming Caller ID with custom information

Sometimes, it is useful to know from which IVR the call is coming from. By settings 'Lobby IVR' here, all calls coming through this IVR will display 'Lobby IVR' on phone display. To show the actual phone number along with our data use '%CALLERID%' with our text(e.g. 'Lobby IVR %CALLERID%'). This will display 'Lobby IVR 55528790' on our phone display, where 55528790 is the phone number of the person calling us.

[a-z][0-9], [%CALLERID%]

Language:

Language used for this choice

us [a-z]

Pre-defined Destination:

Destination number that will be called once this is choosen in IVR

300 [0-9]


Advanced Options

A click on 'Advanced Options' button will open more detailed IVR options

General

Table 7.6. General

Field Description Example Field Type

Status:

Rather then deleting the IVR, set its status to 'Off'. This will make the IVR inactive and all calls will be transferred to 'Operator Extension'.

Lobby IVR has this option set to 'Off'. John dials this IVR number (e.g. 1003) but instead of IVR instructions, his call will be transferred to 'Operator Extension' Option buttons

Operator extension:

Provide the operator extension to which all calls will be redirected to if 'IVR Status' = 'Off'.

Lobby IVR has the 'Status' set to 'Off'. John dials this IVR but instead of IVR instructions, his call will be transferred to the extension number provided here [0-9]

Disable CallerID (PIN-based IVR only)

This option disables CallerID but only for PIN-based IVRs

  Option buttons


General Settings

Table 7.7. General Settings

Field Description Example Field Type

Response Timeout:

Time period in seconds during which an IVR option must be dialed by user

John enters the Sales IVR and hears the instructions. If this field is set to '4', John will have 4 seconds to dial an IVR option [0-9]

RTP Delay [sec]:

Delay time in seconds inserted before the IVR greeting message is played. This solves the 'half-played' file problem. Keep this value between 1-3

User A enters the IVR and hears a message '..me. For sales press 1' and wonders what was that.. what did the voice say!? Set this field to 1 so that 1 second pause is added before the message is played. Now, when user A enters the IVR he will hear 'Welcome. For Sales press 1'. [0-9]

Digit Timeout:

Timeout in seconds during which new digit must be dialed. This option is used with Multi-digits IVR.

John has entered the IVR and wants to dial option 25. If 1 is provided in this field, John will have 1 second to dial number 2, and additional 1 second to dial number 5. If the time exceeds, and John hits 5 too late, IVR will assume that John has dialed option 2 instead of 25. [0-9]

Rings to Answer:

Number of rings played to caller before a call is allowed to enter the IVR

Rather then just 'falling' into IVR, it is recommended to set the number of ring sounds played to caller

[0-9]


Greeting Options

Table 7.8. Greeting Options

Field Description Example Field Type

Play Greeting:

Number of times greeting message is played to caller. If there is no response from the calling party within this time, the call is disconnected.

John enters the sales IVR and hears the IVR options. If John does not dial one of the options, IVR options sound file will be played again, a number of times set in this field, before the call gets transferred to 'Timeout Extension'. [0-9]

Timeout Extension:

Extension number to which the IVR call will be transferred to if there is no response from the user during the 'Play Greeting' time period.

ohn enters the sales IVR and hears the IVR options. If John does not dial one of the options, IVR options sound file will be played again, a number of times set in 'Play Greeting' field, before the call gets transferred to extension number provided here. [0-9]


Operation Times

Set the system open/closed times. Depending on the time when call is received, the call can be redirected to different PBXware destinations

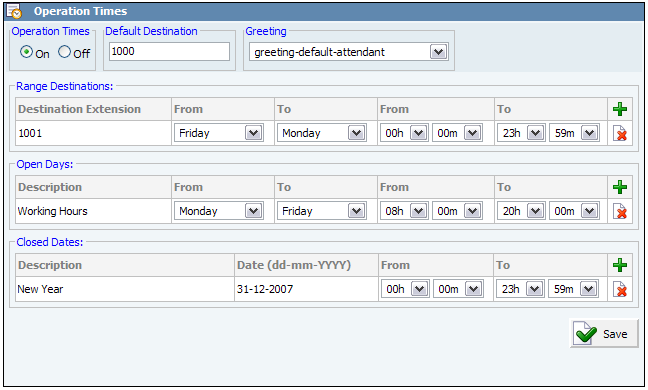
Table 7.9. Operation Times

Field Description Example Field Type

Operation Times:

Enable operation times

Yes, No Option buttons

Default Destination

PBXware extension all calls are redirected to during the closed time hours

1000 [0-9]

Greeting:

Greeting sound file played to callers during the closed times

greeting-*** Select box


Range Destinations: Redirects all calls received during non working hours (e.g. weekend) to PBXware extension provided here.

Open dates: Sets the working hours during which IVR is to redirect calls as set in IVR Add/Edit window. If any call is received during the hours not set here, 'Range Destination' are checked, and if they do not apply, the call is redirected to 'Default Destination'.

Closed dates: Sets the specific date when all calls are redirected to 'Default Destination'.

Ringing Type

Table 7.10. Ringing Type

Field Description Example Field Type

Ringing:

Select the ringing type played back to calling party before they enter the IVR

Rather then just falling into the IVR, play the ring sound to user or music files located under the MOH class

Select box

Music on Hold:

Select the MOH/Music on Hold class, played to users before they enter the IVR

MOH class usually contains one or more sound files. To see these files go to 'System: MOH'

Select box


Local Dialing

Table 7.11. 

Field Description Example Field Type

Dial local/network destinations:

IVR option can dial local network or proper/mobile phone numbers. By setting this option to 'Yes' IVR will be allowed to dial local network extensions only

If IVR has this options set to 'Yes', only local network extensions will be accessible from this IVR. No proper/mobile numbers would be dialed.

Option buttons

Enable range limit:

Tells the system which extensions on local network IVR will be able to dial

  Option buttons

Start at:

Starting number in available range of extensions

1000 [0-9]

End at:

End of available range

2000 [0-9]


Permissions

Permissions is used to allow an organization to restrict who is able to enter an IVR. In particular there are organizations where access to the IVR is only allowed to the callers with a valid account number but it can be used for other similar purposes.

Table 7.12. Permissions

Field Description Example Field Type

Account Access Only:

Allow only certain PBXware extensions to access the IVR

If this option is set to 'Yes', only extension numbers set under the 'Account list' will be allowed to access this IVR

Option buttons

Account List:

Only local extension numbers provided here, separated with a single space, will be allowed to enter this IVR

John dials this IVR, but his extension number is not in the 'Account list'. John is transferred to 'Sales extension'.

[0-9]

Sales Extension:

If caller extension is not provided in the 'Account list' his call will not enter the IVR, but will be redirected to extension number provided here.

John dials this IVR, but his extension number is not in the 'Account list'. John is transferred to extension number provided here.

[0-9]