Administration Interface

In this chapter we will cover:

Extension Control

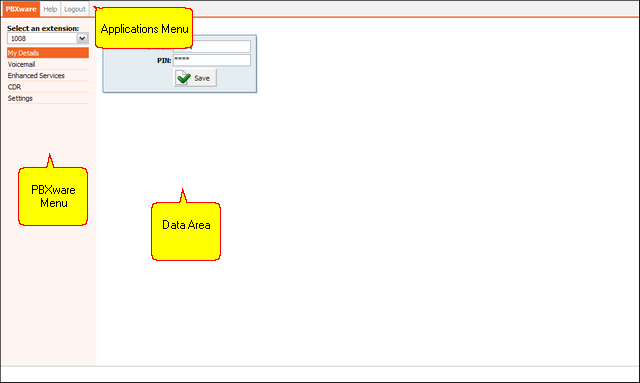
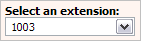
User can monitor multiple extensions through Self Care interface. To administer different extension select its network number from the 'Select an extension' select box.

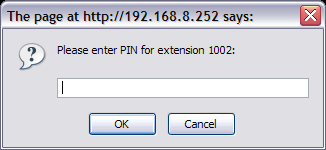
You will be asked to authenticate by providing extension PIN number. If correct extension PIN is provided, user will administer selected extension.

My Details

User can manage his email account and PIN associated with his extension.

[Tip] Tip

If user has voicemail account only(no system extension), this feature will be disabled.

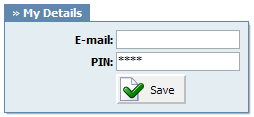
Table 19.2. My Details

Field Description Example Field Type

E-mail:

E-mail address associated with the extension. This address is used for various system notifications and for user logging into Self Care To login into Self Care type this email address into 'E-mail' field [a-z] [0-9] [@._-]

PIN (Personal Identification Number):

Four digit password used for accessing voicemail and other additional PBXware services as well as logging into Self Care To login into Self Care type this number into 'PIN' field [0-9]


Voicemail

User can manage voice messages left on his extension from this location.

Table 19.3. Voicemail

Field Description Example Field Type

Msg:

Voicemail message identification number 0000 Display

Caller:

Identifies the user who has left the message by his name and extension number "BobReilly" <5000> Display

Date:

Time/Date a voicemail has been received in inbox 13 Apr 2006 15:12 Display

Duration:

Time duration of voice message 00:18 Display

Type:

Voicemail file type and size wav49 (9.07k) Display


[Tip] Tip

Disk Space Used By Voicemail Recording

With continuously tone 60 seconds:

  • wav49 = 91.0kb

  • wav = 863.0kb

  • gsm = 91.0kb

With continuously silent tone (without sound) 60 sec:

  • wav49 = 0.38kb

  • wav = 3.0kby

  • gsm = 0.32kb

Actions

Table 19.4. Actions

Field Description Example Field Type

Open:

Displays the content of a voice inbox folder Select a destination folder in a Select box and click this button to display its contents Command Button

Move:

Moves the content into different voice mailbox location/directory Select the box next to a voice message, set the destination folder in the Select box and click this button to move the voice message to new destination/folder Command Button

Forward:

Forward the voice message to other network extension inbox Select the box next to a voice message and click this button. When prompted for extension, type '1005' for example and selected voice message will be transferred to the voice inbox of the network extension 1005 Command Button

Play:

Downloads/Plays the voice message Select the box next to a voice message and click this button to download the message on the Desktop or to play it in favorite media played (depending on the option selected in the popup window) Command Button

Delete:

Deletes the voce message from the inbox Select the box next to a voice message and click this button to permanently delete the voice message from the inbox Command Button


Voicemail Options

Once the user is transferred to party's voice box 'Please leave a detail message after the tone. If you would like to speak to the operator, press 0' message will be heard.

User has two options:

  1. To leave a voice message that is ended by pressing # key or by hanging up

  2. To reach an operator by dialing 0

If 0 is dialed 'Press 1 to accept this recording, otherwise please continue to hold' message will be heard.

User has two options:

  1. Press 1 to save your message and dial the operator. 'Please hold while i try that extension' message played.

  2. Continue to hold to delete your message and dial the operator. 'Message deleted, please hold while i try that extension' message played.

Standard voicemail options with all voicemail settings set to 'Yes':

  • 1 Read voicemail messages

  • 2 Change folders

    • 0 Mailbox options

    • 1 Record your unavailable message

    • 2 Record your busy message

    • 3 Record your name

    • 4 Record your temporary message (new in Asterisk v1.2)

    • 5 Change your password

    • * Return to the main menu

  • 3 Advanced options (with option to reply; introduced in Asterisk CVS Head April 28, 2004 with 'enhanced voicemail')

    • 1 Reply

    • 2 Call back(1)

    • 3 Envelope

    • 4 Outgoing call(1)

  • 4 Play previous message

  • 5 Repeat current message

  • 6 Play next message

  • 7 Delete current message

  • 8 Forward message to another mailbox

  • 9 Save message in a folder

  • * Help; during msg playback: Rewind

  • # Exit; during msg playback: Skip forward

  • * * Help

  • * # Exit

After recording a message (incoming message, busy/unavailable greeting, or name)

  • 1 Accept

  • 2 Review

  • 3 Re-record

  • 0 Reach operator(1) (not available when recording greetings/name)

Enhanced Services

[Tip] Tip

If user has voicemail account only, and no system extension, this feature will be disabled.

Caller ID

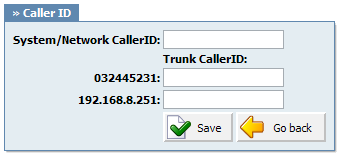
Table 19.5. Caller ID

Field Description Example Field Type

System/Network Caller ID:

Information provided here will replace default Caller ID information on System/Network level Set this option to 'JaKe 2007' and call extension 1005 for example. On the display of the 1005 UAD/Phone, 'JaKe 2007' will be displayed as a caller id information on system/network level [a-z][0-9]

Trunk CallerID:

Caller ID information set per trunk For each trunk available on the system there will be a field in which you may set custom caller id data that is used when calling over that specific trunk [a-z][0-9]


Call Pickup

Table 19.6. 

Field Description Example Field Type

Call Pickup:

This service enables user to pickup ringing calls of the same call group. Dial '*8' to pickup a call from the same call group, or '*88 + $EXTENSION' to pickup calls from different call groups Option buttons


Example:

Extension A:

Call Group = 1

Pickup Group = 3,4

Extension B:

Call Group = 2

Pickup Group = 1

  • If A is ringing, B can pickup the ringing call by dialing '*8'.

  • If B is ringing, A cannot pickup the ringing call because B's call group = 2, and A can pickup only call groups 3,4

[Tip] Tip

Grouping works only within a technology(SIP to SIP or IAX to IAX).
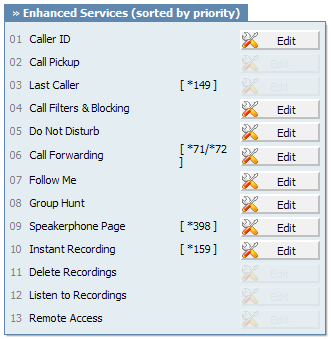
Last Caller

Last Caller:

This service will dial the last extension that was calling you. For example, dial '*149' to hear the extension number and then press '0' to call that number

Call Filters & Blocking

This service forwards calls to other extensions depending on extension response/status

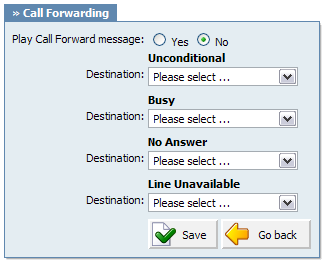
Table 19.7. Call Filters & Blocking

Field Description Example Field Type

Play Call Forwarding Message:

Notify users of a transfer being made. If this option is set to 'Yes', the caller would hear a 'Please wait, your call is being forwarded. You're not being charged for the forwarding part of the call' message, notifying him that a transfer is being made. Option buttons

Unconditional:

Forward all incoming calls. Calls can be forwarded to other extension numbers(Local or Remote) and to local Voicemail Boxes. Option buttons

Busy:

Forward all incoming calls if the extension is busy. Calls can be forwarded to other extension numbers(Local or Remote) and to local Voicemail Boxes if the line has reached the maximum incoming calls limit. Option buttons

No Answer:

Forward all incoming calls if the extension doesn't answer the incoming call. Calls can be forwarded to other extension numbers(Local or Remote) and to local Voicemail Boxes if no one answers the call. Option buttons

Line Unavailable:

Forward all incoming calls if the line is unavailable. Calls can be forwarded to other extension numbers(Local or Remote) and to local Voicemail Boxes if line is, due to any reason, unavailable. Option buttons


Do Not Disturb

This service temporarily redirects all incoming calls to set destination number.

If you wish not to be disturbed set 'Destination'='Voicemail', Enter '1000' in the field bellow and set 'Duration'='1'. This will redirect all calls coming to your extension to extension 1000 voice box.

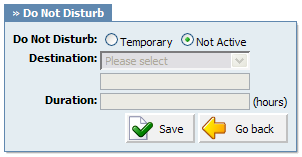
Table 19.8. Do Not Disturb

Field Description Example Field Type

Do Not Disturb:

Activate the DND service This service can be set only on a temporary basis. Select 'Temporary' to activate it Option buttons

Destination:

Destination to be dialed once DND is enabled Select between 'Voicemail' or 'Call forward'. If Voicemail is set, then in the field bellow type the voice mailbox number, '1002' for example [0-9]

Duration:

Time in hours DND service will be active for Set '1' to enable the service for one hour [0-9]


Call Forwarding

This service forwards calls to other extensions depending on extension response/status.

Calls can be forwarded to other extensions/voice inboxes unconditionally, or only if extension is busy, nobody answers or when line is unavailable.

Table 19.9. Call Forwarding

Field Description Example Field Type

Play Call Forwarding Message:

Notify users of a transfer being made. If this option is set to 'Yes', the caller would hear a 'Please wait, your call is being forwarded. You're not being charged for the forwarding part of the call' message, notifying him that a transfer is being made. Option buttons

Unconditional:

Forward all incoming calls. Calls can be forwarded to other extension numbers(Local or Remote) and to local Voicemail Boxes. Option buttons

Busy:

Forward all incoming calls if the extension is busy. Calls can be forwarded to other extension numbers(Local or Remote) and to local Voicemail Boxes if the line has reached the maximum incoming calls limit. Option buttons

No Answer:

Forward all incoming calls if the extension doesn't answer the incoming call. Calls can be forwarded to other extension numbers(Local or Remote) and to local Voicemail Boxes if no one answers the call. Option buttons

Line Unavailable:

Forward all incoming calls if the line is unavailable. Calls can be forwarded to other extension numbers(Local or Remote) and to local Voicemail Boxes if line is, due to any reason, unavailable. Option buttons


Follow Me

This service rings all provided destinations in a sequence. If call is not answered by any of the provided extensions, call gets transferred to 'Last Destination' extension.

For example, extension 5555 has the following extensions under 'Priority' fields: 1000, 1001, 1002 and cell phone 55510205. When someone calls extension 5555, extension 1000 will ring for 'Timeout' number of seconds. If noone answers extensions 1001 is dialled etc. If none of the Priority extensions answers the call, 'Last Destination' extension is called.

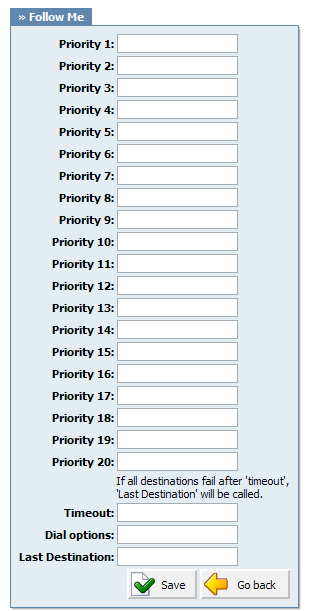
Table 19.10. Follow Me

Field Description Example Field Type

Priority *:

Local/Proper/Mobile numbers to be dialed Enabling this option for extension 1005 and setting 'Priority 1' is set to '1008' and 'Priority 2' to '55510205' will dial local network number 1008. If noone answers during the 'Timeout' period local proper phone 55510205 is dialed etc... [0-9]

Timeout:

Ring time in seconds Time in seconds 'Priority' destinations will ring. If the call is not answered during this period, it gets transferred to next Priority number [0-9]

Dial Options:

Additional call properties This service can be assigned additional call properties, such as allowing the called party to transfer the call etc [a-z]

Last Destination:

The last destination number dialed if none of the 'Priority' numbers answers the call Set this field to 1005. If none of the Priority extensions answers, 1005 is dialed [0-9]


Dial Options:

  • t - Allow the called user to transfer the call by hitting #

  • T - Allow the calling user to transfer the call by hitting #

  • r - Generate a ringing tone for the calling party, passing no audio from the called channel(s) until one answers. Use with care and don't insert this by default into all your dial statements as you are killing call progress information for the user. Really, you almost certainly do not want to use this. Asterisk will generate ring tones automatically where it is appropriate to do so. 'r' makes it go the next step and additionally generate ring tones where it is probably not appropriate to do so.

  • R - Indicate ringing to the calling party when the called party indicates ringing, pass no audio until answered. This is available only if you are using kapejod's bristuff.

  • m - Provide Music on Hold to the calling party until the called channel answers. This is mutually exclusive with option 'r', obviously. Use m(class) to specify a class for the music on hold.

  • o - Restore the Asterisk v1.0 Caller ID behaviour (send the original caller's ID) in Asterisk v1.2 (default: send this extension's number)

  • j - Asterisk 1.2 and later: Jump to priority n+101 if all of the requested channels were busy (just like behaviour in Asterisk 1.0.x)

  • M(x) - Executes the macro (x) upon connect of the call (i.e. when the called party answers)

  • h - Allow the callee to hang up by dialing *

  • H - Allow the caller to hang up by dialing *

  • C - Reset the CDR (Call Detail Record) for this call. This is like using the NoCDR command

  • P(x) - Use the Privacy Manager, using x as the database (x is optional)

  • g - When the called party hangs up, exit to execute more commands in the current context.

  • G(context^exten^pri) - If the call is answered, transfer both parties to the specified priority; however it seems the calling party is transferred to priority x, and the called party to priority x+1

  • A(x) - Play an announcement (x.gsm) to the called party.

  • S(n) - Hangup the call n seconds AFTER called party picks up.

  • d: - This flag trumps the 'H' flag and intercepts any dtmf while waiting for the call to be answered and returns that value on the spot. This allows you to dial a 1-digit exit extension while waiting for the call to be answered - see also RetryDial

  • D(digits) - After the called party answers, send digits as a DTMF stream, then connect the call to the originating channel.

  • L(x[:y][:z]) - Limit the call to 'x' ms, warning when 'y' ms are left, repeated every 'z' ms) Only 'x' is required, 'y' and 'z' are optional. The following special variables are optional for limit calls: (pasted from app_dial.c)

    • + LIMIT_PLAYAUDIO_CALLER - yes|no (default yes) - Play sounds to the caller.

    • + LIMIT_PLAYAUDIO_CALLEE - yes|no - Play sounds to the callee.

    • + LIMIT_TIMEOUT_FILE - File to play when time is up.

    • + LIMIT_CONNECT_FILE - File to play when call begins.

    • + LIMIT_WARNING_FILE - File to play as warning if 'y' is defined. If LIMIT_WARNING_FILE is not defined, then the default behaviour is to announce ('You have [XX minutes] YY seconds').

  • f - forces callerid to be set as the extension of the line making/redirecting the outgoing call. For example, some PSTNs don't allow callerids from other extensions than the ones that are assigned to you.

  • w - Allow the called user to start recording after pressing *1 or what defined in features.conf, requires Set(DYNAMIC_FEATURES=automon)

  • W - Allow the calling user to start recording after pressing *1 or what defined in features.conf, requires Set(DYNAMIC_FEATURES=automon)

Group Hunt

This service will dial all 'Priority *' provided extensions at the same time. If the call is not answered in the 'Timeout' period, by any of the 'Priority' extensions, the call is transferred to the 'Last Destination' extension.

For example, extension 1000 has 'Priority 1' set to '1002', and 'Priority 2' set to '1003'. Once extension 1010 dials the 1000, extensions 1002 and 1003 will ring at the same time(Note that dialed extension 1000 will not ring. In order to ring the dialed extension, simply provide its network number(1000) in one of the 'Priority' fields).

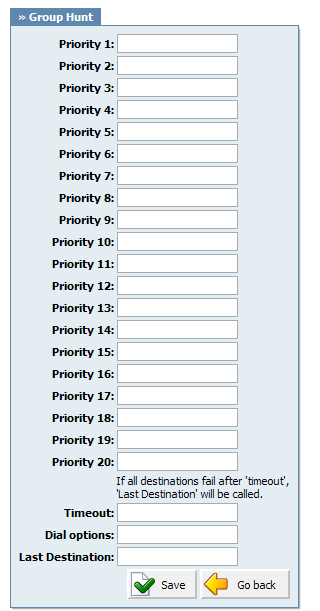
Table 19.11. Group Hunt

Field Description Example Field Type

Priority *:

PBXware/Proper/Mobile numbers to be dialed Enabling this option for extension 1005 and setting 'Priority 1' is set to '1008' and 'Priority 2' to '55510205' will dial local network number 1008 and local proper phone 55510205 at the same time [0-9]

Timeout:

Ring time in seconds Time in seconds 'Priority' destinations will ring. If the call is not answered during this period, it gets transferred to the 'Last Destination'. [0-9]

Dial Options:

Additional call properties This service can be assigned additional call properties, such as allowing the called party to transfer the call etc [a-z]

Last Destination:

The last destination number dialed if none of the 'Priority' numbers answers the call Set this field to 1005. If none of the Priority extensions answers, 1005 is dialed [0-9]


Dial Options:

  • t - Allow the called user to transfer the call by hitting #

  • T - Allow the calling user to transfer the call by hitting #

  • r - Generate a ringing tone for the calling party, passing no audio from the called channel(s) until one answers. Use with care and don't insert this by default into all your dial statements as you are killing call progress information for the user. Really, you almost certainly do not want to use this. Asterisk will generate ring tones automatically where it is appropriate to do so. 'r' makes it go the next step and additionally generate ring tones where it is probably not appropriate to do so.

  • R - Indicate ringing to the calling party when the called party indicates ringing, pass no audio until answered. This is available only if you are using kapejod's bristuff.

  • m - Provide Music on Hold to the calling party until the called channel answers. This is mutually exclusive with option 'r', obviously. Use m(class) to specify a class for the music on hold.

  • o - Restore the Asterisk v1.0 Caller ID behaviour (send the original caller's ID) in Asterisk v1.2 (default: send this extension's number)

  • j - Asterisk 1.2 and later: Jump to priority n+101 if all of the requested channels were busy (just like behaviour in Asterisk 1.0.x)

  • M(x) - Executes the macro (x) upon connect of the call (i.e. when the called party answers)

  • h - Allow the callee to hang up by dialing *

  • H - Allow the caller to hang up by dialing *

  • C - Reset the CDR (Call Detail Record) for this call. This is like using the NoCDR command

  • P(x) - Use the Privacy Manager, using x as the database (x is optional)

  • g - When the called party hangs up, exit to execute more commands in the current context.

  • G(context^exten^pri) - If the call is answered, transfer both parties to the specified priority; however it seems the calling party is transferred to priority x, and the called party to priority x+1

  • A(x) - Play an announcement (x.gsm) to the called party.

  • S(n) - Hangup the call n seconds AFTER called party picks up.

  • d: - This flag trumps the 'H' flag and intercepts any dtmf while waiting for the call to be answered and returns that value on the spot. This allows you to dial a 1-digit exit extension while waiting for the call to be answered - see also RetryDial

  • D(digits) - After the called party answers, send digits as a DTMF stream, then connect the call to the originating channel.

  • L(x[:y][:z]) - Limit the call to 'x' ms, warning when 'y' ms are left, repeated every 'z' ms) Only 'x' is required, 'y' and 'z' are optional. The following special variables are optional for limit calls: (pasted from app_dial.c)

    • + LIMIT_PLAYAUDIO_CALLER - yes|no (default yes) - Play sounds to the caller.

    • + LIMIT_PLAYAUDIO_CALLEE - yes|no - Play sounds to the callee.

    • + LIMIT_TIMEOUT_FILE - File to play when time is up.

    • + LIMIT_CONNECT_FILE - File to play when call begins.

    • + LIMIT_WARNING_FILE - File to play as warning if 'y' is defined. If LIMIT_WARNING_FILE is not defined, then the default behaviour is to announce ('You have [XX minutes] YY seconds').

  • f - forces callerid to be set as the extension of the line making/redirecting the outgoing call. For example, some PSTNs don't allow callerids from other extensions than the ones that are assigned to you.

  • w - Allow the called user to start recording after pressing *1 or what defined in features.conf, requires Set(DYNAMIC_FEATURES=automon)

  • W - Allow the calling user to start recording after pressing *1 or what defined in features.conf, requires Set(DYNAMIC_FEATURES=automon)

Speakerphone Page

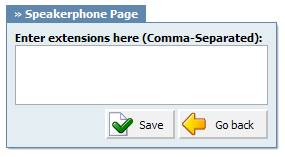
This service enables the message transmit to multiple phones by dialing '*399'.

For example, set this field to '1000,1001,1002' for example. Now dial*399. Extensions 1000,1001,1002 will be paged. If UAD/Phone supports it, the call will automatically go to the speakerphone, otherwise it will just ring

[Tip] Tip

Phones by default have 10 seconds to auto answer.

Instant Recording

This service enables instant call recording, started anytime during the conversation, by dialing *159. For example, you may listen to any call made by extension 1000 for example. Simply dial *159 + 1000
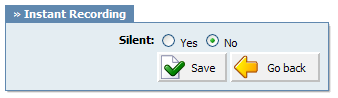
Table 19.12. Instant Recording

Field Descriptiony Example Field Type

Silent:

Should parties in conversation be informed that calls are being recorded With active 'Instant Recording' service, dial *159 anytime during the active call. From the point when you dial this code, the call will be recorded. Option buttons


Delete Recordings:

Table 19.13. 

Field Description Example Field Type

Delete Recordings:

This service enables user to delete recorded calls via Self Care: CDR. For example, with this option enabled, user logs into Self Care, navigates to 'CDR', selects recorded message and clicks on 'Advanced: Delete Recordings'    


Listen To Recordings

Table 19.14. 

Field Description Example Field Type

Listen To Recordings:

This service enables user to listed recorded calls via Self Care: CDR. For example, with this option enabled, user logs into Self Care, navigates to 'CDR', selects recorded message and clicks on 'Listen' button. Selected sound file will be downloaded to local computer from where it can be played in preferred audio player    


Remote Access

Remote Access:

This service enables user access system from remote location. For example, IVR '1001' has the following options set, '4'='Remote access: Destination'. Once remote user enters the IVR he will press '4', type in his extension number and PIN number (both confirmed with '#') and dial any local, mobile or proper number.

CDR

CDR (Call Detail Records) for all placed or received calls on the system. In addition to normal operation an authorized user is able to perform additional actions such as extensive search, listen to recorded calls, call any destinations listed and access advanced features.
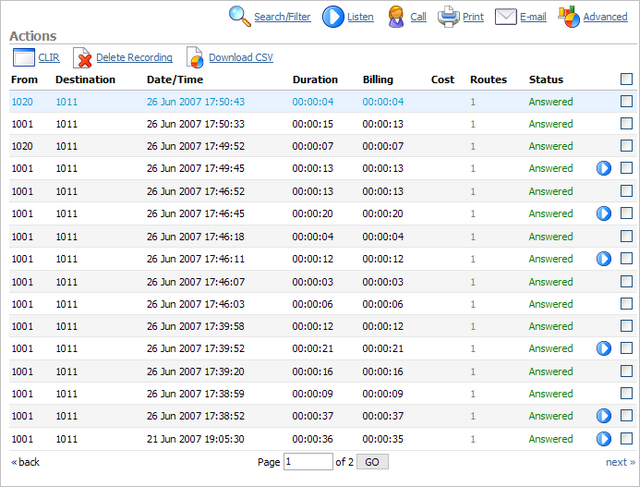
Table 19.15. CDR

Field Description Example Field Type

From:

Extension number the call was made from If call was made from extension 1001 to extension 1004, '1001' is displayed here. Display

Destination:

Extension number the call was made to If call was made from extension 1001 to extension 1004, '1004' is displayed here. Display

Date/Time:

Date and Time when the call was made 04 Oct 2006 10:44:10 Display

Duration:

Call duration time in hh:mm:ss format 00:12:45 Display

Billing:

Time billed by the system 00:12:45 Display

Cost:

Total cost of the call calculated through a service plan 0.71 Display

Routes:

Number of system routes If call goes directly from extension to destination - '1' will be displayed here. If call has entered the IVR and was then redirected to Queue and then Agent answers the call '2' will be displayed here (IVR and Queue were used) Display

Status:

Displays the call status

Depending on whether a call was answered or not, this field value may have the following content:

  • Answered

  • Not Answered

  • Busy

  • Error

Display
This icon is displayed once a call is recorded and 'Delete' or 'Listen' enhanced service is active    
This is a box used with the CDR commands to select a desired call    


[Tip] Tip

Disk Space Used By Call Recording

With continuously tone 60 seconds:

  • wav49 = 84.5kb

  • wav = 833.0kb

  • gsm = 85.0kb

With continuously silent tone (without sound) 60 seconds:

  • wav49 = 84.0kb

  • wav = 827.0kb

  • gsm = 84.0kb

Search/Filter

Table 19.16. Search/Filter

Field Description Example Field Type

Start Date:

Select a Search/Filter start date Click on a small 'Calendar' icon next to a field and select desired date Option button

End Date:

Select a Search/Filter end date Click on a small 'Calendar' icon next to a field and select desired date Option button

Status:

Search calls by selecting desired call status

Click on a 'Please Select' button and select one of the available fields:

  • All

  • Answered

  • Not Answered

  • Busy

  • Error

Select box

Type:

Search calls based on the type of calls

Click the 'Type' button and select one of the available fields:

  • All

  • Outgoing

  • Incoming

Select box


[Tip] Tip

After making any changes to search filter, be sure to click the search icon

Actions

In this chapter we will cover:

Listen

Table 19.17. Listen

Field Description Example Field Type

Listen:

Once the 'Listen' icon is displayed next to a call record it means that the specific call was recorded. To play recorded calls, check the box next to a 'Listen' icon and click 'Listen'. Browser will prompt you to open the sound file in your favorite audio player or to download the sound file. Option button


[Tip] Tip

By default the sound format is available as a .gsm file. To change the recording format go to: 'Settings: Servers: Edit: Recordings format' and select one of the available sound formats:

  • gsm

  • wav

  • wav49

  • ogg

Call

To establish a call between any PBXware extension with a listed extensions you have to provide only two things. The Caller $EXTENSION number and the $DESTINATION extension

Table 19.18. Call

Field Description Example Field Type

Caller

PBXware extension that will make a call Provide any PBXware extension number here, 1001 for example [0-9]

Destination:

Destination extension that will be dialed by 'Caller' extension To select a destination extension, first check a box next to a CDR record. This field will display two extensions listed under 'From' and 'Destination' selected record Select button


[Tip] Tip

After setting 'Caller' and 'Destination' extensions click the call icon

Print

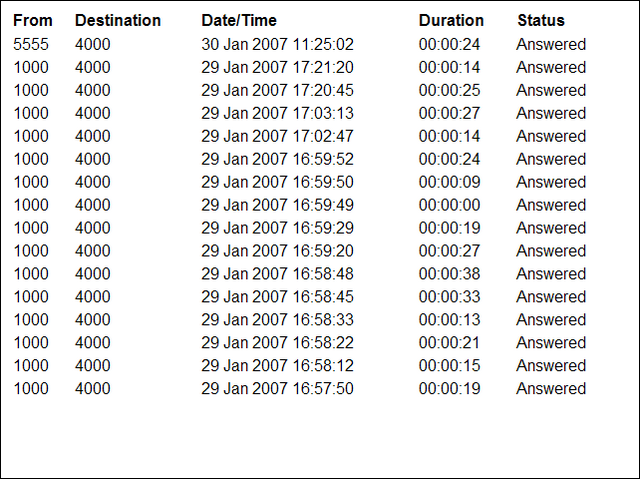
Check the box next to a call record and click the 'Print' button. This action will open a new popup window with the printing interface.

Email

Check the box next to a call record and click the 'Email' button. A small popup dialog will appear. Provide email address here and click 'OK' button to send the records.

Settings

These options mimic the functions of an answering machine but with many additional features added. Voice messages are saved on central file-system location instead on a UAD/Phone.

Accessing voice-box:

To access voice-box dial '*123', enter extension PIN and follow the instructions.

Leaving a voice message:

When user is transferred to extension's voice-box, 'Please leave a detail message after the tone. If you would like to speak to the operator, press 0' message will be heard.

Two options are available:

  1. Leave a voice message(ended by pressing '#' key or hanging up)

  2. Reach an operator by dialing '0'

If '0' is dialed, 'Press 1 to accept this recording, otherwise please continue to hold' message will be heard.

Two options are available:

  1. Press '1' to save your message, after which the operator will be dialed. 'Please hold while i try that extension' message will be heard

  2. Continue to hold, which will delete any left messages, after which the operator will be dialed. 'Message deleted, please hold while i try that extension' message will be heard.

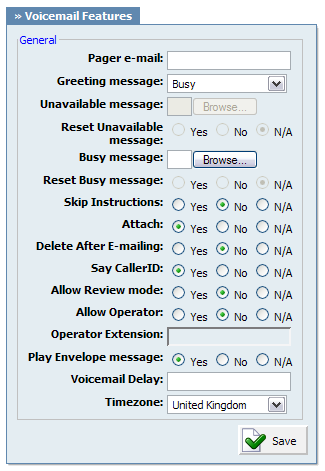
Table 19.19. Settings

Field Description Example Field Type

Pager e-mail:

Pager e-mail address associated with the voice box. When A calls B and leaves a voice message, B will get a pager email notification about new voice message. [a-z] [0-9] [@._-]

Greeting message:

Greeting message played to users upon entering the voice box. When A gets to B's voice box, the selected 'Greeting message' is played to A before he is allowed to leave a message. Select box

Unavailable message:

Upload unavailable message Click on the 'Browse' button and select a sound file from local computer to upload it as a custom unavailable message. Button

Reset Unavailable message:

Resets the user recorded/uploaded unavailable message. Custom unavailable messages can be recorded through UAD/Phone or uploaded to voice box through Self Care. To revert to default system unavailable message select 'Yes' and save the extension settings. Option buttons

Busy message:

Upload busy message Click on the 'Browse' button and select a sound file from local computer to upload it as a custom busy message. Button

Reset Busy message:

Resets the user recorded/uploaded busy message. Custom busy messages can be recorded through UAD/Phone or uploaded to voice box through Self Care. To revert to default system busy message select 'Yes' and save the extension settings. Option buttons

Skip Instructions:

Skip the instructions on how to leave a voice message. Once user A reaches the dialed voice box, if this option is set to 'Yes', A will hear the 'Greeting message', and then be transferred directly to the 'beep' sound. Option buttons

Attach:

Send the voice message as an attachment to user email. Once B gets the new voice message, if this option is set to 'Yes', the message sound file will be attached to the new voicemail notification email. Option buttons

Delete After E-mailing:

Delete voice message after sending it as an attachment to user email. Once B gets the new voice message, if this option is set to 'Yes', the message will be deleted from the voice box after it has been emailed to B. Option buttons

Say Caller ID:

Announce the extension number from which the voice message has been recorded. If this option is set to 'Yes', when checking voicemail, 'From phone number {$NUMBER}' message will be heard. Option buttonsy

Allow Review mode:

Allow B to review the voice message before committing it permanently to A's voice box.

B leaves a message on A's voice box, but instead of hanging up, he presses '#'. Three options are offered to B:

  • Press 1 to accept this recording

  • Press 2 to listen to it

  • Press 3 to re-record your message

Option buttons

Allow Operator:

Allow B to reach an operator from within the voice box.

B leaves a message on A's voice box, but instead of hanging up, B presses '#'.

'Press 0 to reach an operator' message played (Once '0' is pressed, user is offered the following options):

  • Press 1 to accept this recording (If selected, 'Your message has been saved. Please hold while I try that extension' is played and operator is dialed)

  • Or continue to hold (If B holds for a moment, 'Message deleted. Please hold while I try that extension' is played and operator is dialed)

Option buttons

Operator Extension:

Local extension number that acts as an operator. If A's voice box has an option 'Allow Operator' set to 'Yes', all users dialing '#0' inside the voice box will reach this operator extension. [0-9]

Play Envelope message:

Announces the Date/Time and the Extension number from which the message was recorded. Once voice box is checked for new messages, if this option is set to 'Yes', 'Received at {$DATE}. From phone number {$NUMBER}' will be played, giving more details about the message originator. Option buttons

Voicemail Delay:

How long to pause in seconds, before asking user for PIN/Password. Some UADs/Phones have tendency to garble the beginning of a sound file. Therefore, user checking the voice box, when asked for password would hear '...sword' instead of 'Password'. Setting this field to 1-2 seconds will provide long enough gap to fix this anomaly. [0-9]

Timezone:

Sets the correct date/time stamp. By setting the correct time zone, user would always be notified of the exact date/time voice message was left on their box. Set the correct time zone if user is located in different time zone then PBXware. Select box


[Tip] Tip

Timezones are taken from '/usr/share/zoneinfo' system directory

[Tip] Tip

Disk Space Used By Voicemail Recording

With continuously tone 60 seconds:

  • wav49 = 91.0kb

  • wav = 863.0kb

  • gsm = 91.0kb

With continuously silent tone (without sound) 60 sec:

  • wav49 = 0.38kb

  • wav = 3.0kb

  • gsm = 0.32kb