With your phone connected to the Microsoft� Office Communication Server 2007 you have basic call features.
Stay tuned for more advanced features (e.g., set presence, view presence status, etc.) coming shortly.
Update: With the Version from 12.th of November we incorporated a new "Easy-Setup" for OCS, this includes default settings for OCS. To become effective you need to perform a factory reset of your phone after the update.
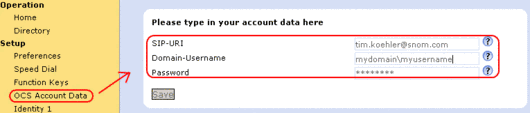
When done, go to the menu "OCS Account Data", enter the users SIP-URI, domain username and Password. The phone then should autoconfigure. This only works inside the network (the snom OCS edition can not yet detect the EDGE server from the internet). If this fails you may want to proceed to the Identity to change required settings manually.
Easy Setup
- Install the new snom OCS edition
- Perform a factory reset (Advanced -> Update -> Reset -> Yes)
- Go to "OCS Account Data".
- Enter your data, save and you're done.
This will autoconfigure the Identity 1 (this will not work if the phone needs to connect from outside the company over an EDGE server).
Manual Setup
Display Name = Name or number
Account = User part of the SIP-URI (e.g., in the case of"tim.koehler"is the username)
Password = User's password
Registrar = The domain name you are using (server part of the SIP-URI, e.g. in the case of [email protected] it is"snom.com")
Outbound Proxy = The Microsoft� Office Communication Server 2007 address with the transport=tls parameter
Authentication Username = The Microsoft Active Directory (Microsoft� Office Communication Server 2007 enabled account name) username (optional with internal Domain mydomainmyusername).

LDAP Setup - Configure address book search with Microsoft� Active Directory (via snom LDAP)
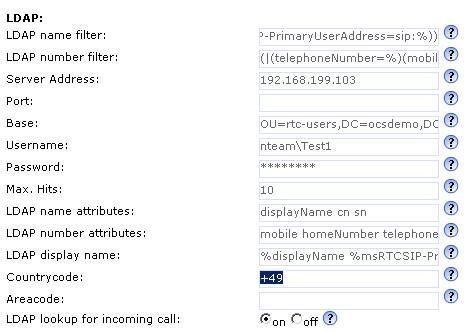
Now you can set up the Directory search to enable direct name dialing. Go to the "Advanced" menu item and scroll down to LDAP.
Set the following parameters:
LDAP name Filter = (|(name=%) (msRTCSIP-PrimaryUserAddress=sip:%))
LDAP number Filter = (|(telephoneNumber=%)(mobile=%)(homePhone=%)(ipPhone=%))
Server address = Active Directory server (AD)
Base = OU=rtc-users,DC=ocsdemo,DC=net
LDAP name attributes = displayName cn sn
LDAP number attributes =mobile homeNumber telephoneNumber msRTCSIP-PrimaryUserAddress
LDAP display name = %displayName %msRTCSIP-PrimaryUserAddress
Optional: Switch LDAP results to show name AND number
To be shown a name and the corresponding phone number in the results of the LDAP query, please go to "Preferences" and change:
Number Display Style = Name + Number
Then you will also get the number when doing an address book search.

|